Endodontics vs. implants: understanding the possibilities of retreatment procedures -- Part 1

By Richard E. Mounce, DDSThis two-part column on endodontics vs. implants was written to evaluate several different clinical scenarios with regard to the feasibility of endodontic retreatment from a clinical perspective. A variety of cases will be examined critically in Part 2 of this two-part article with regard to the predictability of the revision of previous failed root canal treatment, restorability, and long-term viability. Emphasis will be placed on treatment planning and practical clinical considerations. When presented with the option of an implant or retreatment of a failing root canal procedure, most patients would opt for retreatment to retain their natural teeth. Retreatment is less invasive, less expensive, and less time-consuming than the implant alternative. The success rates quoted in the endodontic literature for retreatment vs. single-tooth implant success and failure are essentially identical. From a treatment-planning perspective, teeth that can be retreated well and with same degree of clinical success should be retreated. In either case, it is essential that patients understand the procedure, alternatives, risks, and costs and have their questions answered, whether they are having an extraction and implants placed or endodontic retreatment.Several strategies are universal to endodontic retreatment. These strategies are mentioned here to give context to the cases that are described in Part 2. Endodontic retreatment is inherently complex. Understanding which teeth are restorable and which should be extracted is often determined by which teeth are vertically fractured and/or which teeth have a high likelihood of becoming vertically fractured in the future. Furthermore, while often challenging to determine, the fate of retreatment procedures rests largely in the ability of the clinician to achieve apical patency when judging the initial radiographs and, once attained, to use this patency to properly shape and disinfect the canal space. To achieve apical patency, it is axiomatic that the clinician first disassemble the existing root canal (remove gutta percha, instrument fragments, posts, etc.), repair perforations, and then seek to negotiate the canal path to the minor constriction of the apical foramen (MC). Retreatment is generally a microsurgical specialist procedure, and attempting it without the correct equipment and supplies is clinically contraindicated. Attempting retreatment without the needed skills and equipment is the harbinger of further iatrogenic events and tooth loss. Alternatively, a keen understanding of what teeth can be retreated, why, and how is a cornerstone of endodontic specialty practice and natural tooth retention. The above notwithstanding, it has value for the general practitioner to understand several basic concepts that are required for the best chances of clinical success employing retreatment. To this end, once a decision to retreat a tooth has been made, it is most fruitful to employ the following strategies.1) When in doubt, remove the crown and all restorative materials to determine the amount of remaining tooth structure. After crown removal, all caries, unsupported tooth structure, and restorative materials should be removed to determine the amount of sound tooth structure remaining. It is not unusual to find teeth that appeared previously restorable yet after removal of the crown, caries and the creation of ideal access were judged nonrestorable. Removing such hopeless teeth can only improve clinical endodontic success for obvious reasons. 2) Optimal visualization is essential to perform endodontics at the highest level, ideally the surgical operating microscope (SOM) (Global Surgical, St. Louis, MO, USA) and loupes (4.8X HiRes, Orascoptic, Middleton, WI, USA). Working without either the optimal visualization or magnification increases the chance of missed canals and iatrogenic events of all types. Alternatively, optimal control over the process of cleaning, shaping, and obturation has, as its foundation, the ability to fully visualize the tooth and have tactile control.3) Use of the rubber dam. Use of the rubber dam is the legal, ethical, and clinical standard of care in North America. 4) Conservative use of heat first, mechanical means second, and chloroform third to dissolve and remove gutta percha from the root canal system. The removal of gutta percha is passive and not directed initially at the enlargement of the canal space, but rather, the atraumatic removal of the existing gutta percha. While a comprehensive discussion of the use of these means for the removal of gutta percha is beyond the scope of this article, it is essential to appreciate how easy it is to deviate from the canal, remove excessive dentin, and separate RNT files during gutta percha removal using mechanical means if the task is performed inappropriately. The Twisted File* (TF) is an excellent option for RNT removal of gutta percha as well as to shred through the plastic carrier of warm carrier-based systems if used with the correct apical pressure (passive, yet intentional apically directed pressure) and rotational speed (900 to 1,200 rpm). Heat and the .08/25 TF are used to remove the vast majority of gutta percha. Chloroform is used only to remove the remaining few mm of gutta percha that might be present in the apical third of the root canal system after using heat and mechanical means. Chloroform should be used sparingly. Chloroform is introduced into the canal one drop at a time and removed from the canal through wicking the slurry that results from the introduction of hand K files into a canal that contains both chloroform and gutta percha. At all costs, chloroform should be prevented from passing through MC during the creation of this slurry while making apical progress. Once the previous obturation is evacuated from the root, attention should be directed at assuring that all canals are located. After all canals are located, achieving apical patency is paramount. From a conceptual viewpoint, evacuation of gutta percha is the platform for achieving apical patency. After gutta percha is removed from the canal, patency is assured, the glide path created, and then — and only then — are RNT files inserted to prepare the final canal taper and master apical diameter. Placing a rotary nickel titanium (RNT) file into a root which has just had apical patency achieved without preparing a glide path is highly problematic. To do so without first preparing a glide path is the harbinger of fracture and canal transportation. Achievement of apical patency in retreatment is laborious and time-consuming; it cannot be done with speed as the primary consideration. Hand K files should be precurved and of an appropriate length to give the clinician tactile control over blockages or ledges that might be encountered. Clinically, this means that #6 and #8 hand K files are precurved (and trimmed as needed) and inserted with gentle, but intentional pressure into the canal to gain apical length until patency is assured, always in the presence of irrigant. 5) Retreatment requires mastery of several additional treatment protocols, ultrasonic tip use, ultrasonic and negative pressure irrigation, master cone fit, application of perforation repair materials, among many other clinical techniques. Many of these techniques can only be learned in a literature-based university program with experienced instructors and the SOM. Apices tend to be perforated and transported in failed root canal procedures. Knowing how to manage all of these events is critical for endodontic retreatment. Perforated apices, for example, risk extrusion of both irrigants and obturation materials if they are not managed correctly. Retreating endodontic cases proficiently demands that the clinician have perforation repair materials available and be fully conversant with their uses, indications, contraindications, etc., and have the lighting, magnification, and instruments to apply these materials, aside from the needed training. 6) The placement of a postendodontic coronal seal cannot be overstated in its importance, especially after retreatment. Coronal microleakage is correlated in the endodontic literature with clinical failure. Empirically, virtually every single case of endodontic failure that I have observed while retreating endodontic failures has shown overt evidence of coronal microleakage. This microleakage is clinically evident in the form of moisture, unset restoratives, voids, purulence, discolored obturation material, recurrent decay, etc. Clinically coincident to this evidence of microleakage, it is common to find missed canals as well as iatrogenic events. This underscores the value of bonding the obturation with a material such as RealSeal.* In numerous in vitro and in vivo studies, RealSeal has shown to provide a statistically superior resistance of coronal microleakage relative to gutta percha. RealSeal is a synthetic polymer of polyester that contains bioactive glass, methacrylates, and calcium hydroxide and is highly radiopaque. It is available in two forms, a master cone-based form as well as in obturator-based form (RealSeal One Obturators)*. RealSeal master cones are applied in the same manner as gutta percha and are removable with the same methods. RealSeal master cones and obturators are used with a self-etching sealer (RealSeal SE sealer*). While I recommend that the smear layer be removed by a one- to two-minute rinse of 17% liquid EDTA (Smear Clear*) even when using gutta percha, it is especially important when bonding the obturation with RealSeal. Smear layer removal opens up the tubules in the coronal and middle third to optimize bonding.7) After straight-line access is prepared, the cervical dentinal triangle removed, and glide path enlarged, the canal is ready for TF (or whatever RNT files are being used). In the vast majority of canals prepared in general practice, the sequence of .08/25 TF, .06/30, .06/35, .04/40, and .04/50 TF is used (depending on the desired master apical diameter). Usually, in the above suggested sequence, the .08/25 TF will reach the apex in three to four insertions, and the .06/30 TF (and the successive files used to prepare the master apical diameter) will reach the apex in one insertion each.8) Once the canal is open, negotiable, and patent, optimizing the master apical diameter is clinically valuable relative to using a smaller master apical diameter. The endodontic literature is quite clear that the larger the apical diameter, the cleaner the canal that ultimately results. Clinically, this means that a #50 ISO apical size at the MC creates a cleaner canal than a #30; a #40 ISO apical size creates a cleaner canal than a #20; etc.9) Once the canal has been made patent, the basic taper prepared, and the master apical diameter shaped, activating irrigation is especially important in retreatment using one of the available means, whether the ultrasonic or a negative pressure method. For clinicians with ultrasonic units (MiniEndo, Orange, CA, USA), one method to activate irrigation is the use of stainless steel or nickel titanium-activated files. For clinicians without ultrasonic units or those looking for another innovative technology, the EndoVac II (Discus, Dental, Culver City, CA, USA) allows the use of macrocannula and microcannula for removal of gross debris and fine debris with the intent of improving the circulation of irrigant down the canal while eliminating any possibility of extrusion of the irrigant beyond the root apex. The scientific endodontic literature is highly favorable to both of these methods to optimize canal cleanliness. Part 2 of this two-part series will examine a series of cases that discuss retreatment in a clinical context using the aforementioned principles and consideration.I welcome your feedback. *SybronEndo (Orange, CA, USA)
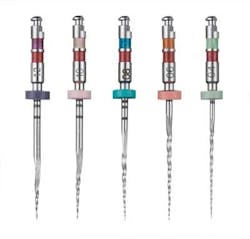
Fig. 1: The Twisted File*

Fig. 2: The Elements Obturation Unit*

Fig. 3: RealSeal Bonded Obturation*

Fig. 4: The MiniEndo*

Fig. 5: The EndoVac II System

Richard E. Mounce, DDS, is the author of the nonfiction book “Dead Stuck” — “one man's stories of adventure, parenting, and marriage told without heaping platitudes of political correctness.” Pacific Sky Publishing. DeadStuck.com. Dr. Mounce lectures globally and is widely published. He is in private practice in endodontics in Vancouver, Wash. Contact him at [email protected].