Claspless, removable partial dentures using implant-supported Locator attachments

This article first appeared in the newsletter, DE's Breakthrough Clinical with Stacey Simmons, DDS. Subscribe here.
Implant-supported Locator-type attachments (Zest Anchors LLC) have been used to stabilize complete dentures for decades. They offer a reasonably affordable option for denture-wearing patients to improve their quality of chewing and quality of life. An often-overlooked use of Locator attachments is the stabilization of removable partial dentures (RPDs). Locators can improve retention and esthetics, and they can be used to salvage a comfortable RPD when an abutment tooth is lost.
Uses for Locator attachments with RPDs include stabilizing distal extensions, hiding unsightly clasps, customizing retention to the patient’s desire, and creating a retention system where retention can be easily regained when it lessens (by replacing the worn retentive nylon).
ADDITIONAL READING |Pumpkin on a toothpick
Implants can often be placed in the extraction site of a failed RPD abutment tooth. In these cases, I add the missing tooth to the partial denture after tooth extraction. The implant is buried under the soft tissue using a cover screw instead of a healing abutment to minimize forces on the healing site. I stabilize the RPD with denture adhesive or a temporary wrought wire clasp if needed. After four to six months, I uncover the implant, place the Locator abutment, and perform an intraoral pickup of the metal housing and attachment.
Basic Locator principles
It is important to remember that the implant and attachment are there to retain the RPD, not support it. Forces during compression should be distributed over the soft tissue and bone as well as over any remaining supporting teeth. Applying compressive forces to the implant increases the potential for an undesirable “bending moment” (a rotational force on the implant) that can lead to bone loss and implant failure. To minimize stress on the implant, it is advisable to place light finger pressure on the RPD while picking up the metal housing. Additionally, avoiding angles of more than 20 degrees between the long axis of the implant and the opposing force will help lessen bending moments in situations where forces are inadvertently applied to the implant. With complete dentures, a minimum of two implants is recommended in the mandible and a minimum of four in the maxilla to minimize stress on the implants. When an RPD is retained, the number of implants can be less since the remaining teeth can minimize rotation forces on the implants. Additional considerations are:
- It is ideal to have 1.5 mm of the abutment above soft tissue level for proper engagement of the Locator retentive nylon.
- Torque the abutment to 30 Ncm (per Zest Anchors recommendation).
- A minimum of 11 mm from the implant platform to the opposing dentition is ideal to prevent fractures of the RPD over the Locator housing.
- At recall visits, confirm that the RPD doesn’t need a reline, since a tissue misfit may result in increased forces on the implant. Do this by feeling for a soft tissue “squish” when applying finger pressure. If tooth support prevents this, then place a small amount of bite registration material or soft liner on the soft tissue-borne portion of the RPD and fully seat the prosthesis, making sure to engage the Locator. Once set, remove the RPD and measure the material with a probe to see if a reline is indicated.
ADDITIONAL READING | Dentures, partials, and their role in dentistry
Case sample
This patient had worn the same partial denture for five years and liked the fit. Tooth No. 11 was guarded due to substantial bone loss. When abutment tooth No. 5 fractured and required extraction, it was decided to salvage the existing RPD by placing implants and Locator attachments at the sites of Nos. 5 and 11, which the patient chose to extract at this time due to their poor prognosis. Immediate implant placement was performed at both sites. The patient wore a provisional “flipper” during the implant integration period of six months.
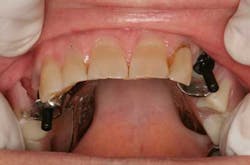
After uncovering the implants, Locator abutments were torqued to 30 Ncm (figure 1). Parallel posts were seated on the abutments, and complete seating of the original RPD was confirmed (figure 2). It was planned to remove the existing metal clasps at sites of Nos. 5 and 11, so they were removed at this time to prevent interference with the parallel posts. Clasps can also be removed at the lab if desired. A small amount of PVS adhesive was placed on the intaglio surface prior to seating the RPD.
The RPD was fully seated and the plastic parallel posts were bonded to the RPD using GC Pattern Resin (GC America) (figure 3). This is done to ensure a very accurate and stable fit of the parallel posts, which are being used as impression transfers in this case.
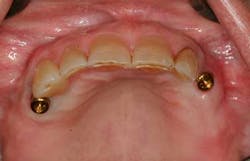
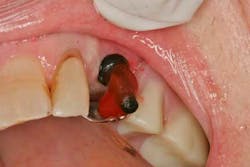
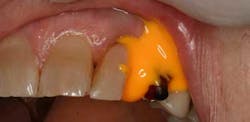
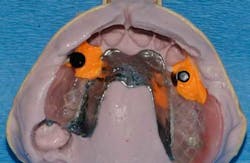
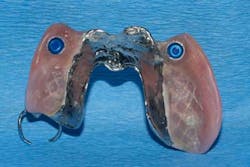
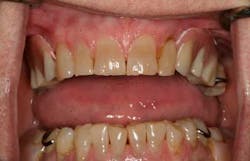
Light-body PVS impression material was injected around the posts to pick up soft-tissue detail (figure 4). After this, the RPD was picked up using an alginate impression (figure 5). I use Kromopan 100 (Kromopan USA, Inc.), which can be poured safely at the lab within a few days. The lab added teeth Nos. 5 and 11 as well as the Locator retentive nylons and their metal housings (figure 6). The modified RPD is well retained and esthetic (figure 7). The patient was so impressed with dental implants that she replaced her lower RPD with implant-supported crowns the following year.
Utilizing implant-supported Locators to retain RPDs is a great service to offer in your practice. It can result in more patient referrals and—more importantly—more happy patients!
This article first appeared in the newsletter, DE's Breakthrough Clinical with Stacey Simmons, DDS. Subscribe here.

About the Author

John A. Hodges, DDS, FICOI
John A. Hodges, DDS, FICOI, graduated from the University of Southern California Dental School in 1993. He runs a practice dedicated solely to dental implant services in Covington, Washington. Dr. Hodges lectures nationally for Neoss and Nobel Biocare on subjects including full-arch implant prosthetics, restorative complications, and Locators. He completed the fellowship program at the California Implant Institute, has restored hundreds of fixed full-arch implant restorations, is a Nobel Biocare CAD-certified technician, and is a fellow of the International Congress of Oral Implantologists. Contact him through his website.