Moving the Midline
WRITTEN BY
Jenifer C. Back, DMD
Operating a reconstructive and cosmetic practice today has become easier due to all of the advances in restorative materials. I am a functional cosmetic dentist and a huge fan of Dr. Ross Nash of Charlotte, N.C. After attending the Nash Institute, I adopted the conservative approach. I want to create beautiful teeth while conserving tooth structure, so I was pleased to learn that my lab technician could create beautiful Empress Esthetic restorations with minimal reduction in most cases.
The midline case
Deanna Jordan, a 36-year-old female, presented to our office with an extensive history. As we reviewed her dental history, it was clear that her faith had been shattered. She had been told many times by many dentists that her problem could be corrected, and she experienced much disappointment. Deanna had orthodontic treatment as a young child. At that time, she and her parents were given an option of single-tooth extraction on Tooth No. 4 to speed up the treatment. Deanna didn’t understand the consequences; the teeth were straight but the midline shifted about 2.5 mm to the right.
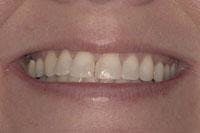
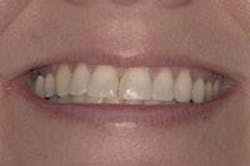
Deanna was very aware of her misalignment and sought treatment from an orthodontist in early adulthood. However, because of a perceived tooth size discrepancy, she was left with a space between Nos. 8 and 9. As a result, she was advised by another dentist to have composite bonding done on those teeth. This moved the midline back to the right. Deanna was distraught and ready to give up (Figures 1 and 2).
Moving a midline can be intimidating, especially when the teeth are virgin and have good color characteristics. Today, it can be routinely accomplished with predictable results by following a proven protocol. The following case is a step-by-step approach to a challenging situation.
The process begins
To achieve the most esthetic results, we began our process with a records appointment including intraoral photography, facebow transfer, centric relation registration, and study models.
Our master lab technician, Tim Culp of Esthetic Effects in Sarasota, Fla., created a diagnostic wax-up to achieve the golden proportion (a mathematic ratio in which the width of the lateral is equal to 1.0, the central 1.6, and the canine .6 for visible surface). This creates equal space in appearance even when the space is not equal. To create this amount of visible tooth ratio, we extended the mesial marginal ridge of Nos. 6, 7, and 8 and created a partial pontic effect. We also contoured the distal marginal ridge of No. 6 to minimize the visible surface. This diagnostic process allowed us to determine the minimum number of teeth to be prepared to achieve an excellent result.
Our initial work-up also included a diagnostic image for the patient to confirm our plan, and to see how it would appear in the mouth. In this step, it is important to do a custom image, one that is truly attainable. Our office uses Adobe Photoshop to create custom images. When Deanna saw this image, she was very excited about treatment.
Esthetics considerations and planning
Once we determined the desired smile design outcome, we addressed shade-taking. We generally use in-office Zoom-2 whitening to achieve our starting shade. In this case, our patient started out at shade A-2 on the Vitapan Lumin shade guide. She whitenened up to nearly 03M on the Vitapan 3-D extended shade guide.
Next we used a reduction stint to assure minimum reduction for material selection. In this case we chose Empress Esthetic, and we know that the minimum tooth preparation requirements are .6 mm at the gingival, .7 mm at the middle third, and 1 mm at the incisal edge. The gingival margin is a shoulder with a rounded internal line angle of about 10 to 30 degrees.
Understanding only minimal reduction is necessary, we categorized our treatment as conservative, even as we restored Teeth Nos. 5 through 13 with Empress Esthetic veneers and No. 3 with an Empress crown. Tooth No. 3 was referred to our endodontic specialist Joslyn Jenkins, DMD, for retreatment. In addition, Tooth No. 7 received a gingival graft from our periodontist, Ryan Taylor, DDS, MS, who prepared this area for perfect gingival contour.
Treatment
The preparation appointment was a little more complex, as we had to remove more tooth structure on the mesial of No. 9 so that we could move the midline to the patient’s left. This appointment was a full day. We used the Nash Institute inlay/onlay veneer preparation kit (available through Brasseler) to prepare the teeth. After minimal reduction, we disinfected the oral cavity with a chlorhexidine rinse.
Temporization was completed using a Siltec matrix of the diagnostic wax-up. We used a bis-acryl automix material (Access Crown bis-acryl temporary material) in Bleach shade for the provisional restorations. We cemented our provisionals with Access temporary crown cement by Centrix.
In this type of case, the patient decides if it is a success, so we make adjustments to the provisionals per patient evaluation. If the patient likes the bleach shade temporaries, we evaluate shade selection using the Vitapan 3-D shade guide.

After wearing the provisionals for several days, we reviewed the patient’s appearance. She was ready for the periodontal work. Dr. Taylor brought the tissue incisally about 2 mm on No. 7 with a gingival graft to meet the temporary margin.
Final impressions and completion
After several weeks of healing, the patient was ready for final impressions. We made two polyvinyl impressions of the preparations using a single-stage impression (Affinis heavy and light body impression material, Coltene Whaledent). Next, our lab technician fabricated nine Empress Esthetic veneers and one Empress crown.
We saw the patient for a try-in appointment, and with a few minor changes we were finished. We cemented all the restorations with Appeal shade Medium by Ivoclar. The color of this cement is great for approximating the natural light shade of dentin found in many of these cases.
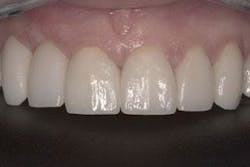
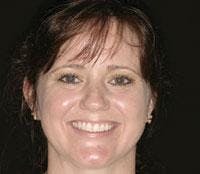
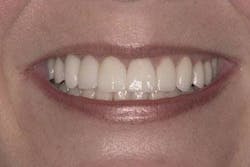
The restorations were absolutely beautiful. Our patient now has the smile of her dreams (Figures 3, 4, and 5).
With a conservative approach and Empress Esthetic, you will feel comfortable offering many patients an excellent cosmetic result. ■
Jenifer C. Back, DMD
Dr. Back has practiced in Sarasota, Fla., for the past 10 years and is the owner and developer of Sarasota Smile Design, a luxury cosmetic dental practice. She is currently an instructor with the Nash Institute for Dental Learning, a training facility for advanced cosmetic functional dentistry. Contact Dr. Back at [email protected].