You can’t touch this! Proper dental instrument sterilization

Years ago, dental professionals routinely hand scrubbed instruments. Many auxiliaries from this era are still of the mindset that items are not properly cleaned if they are not precleaned by hand scrubbing. This is not the case.
When the ultrasonic bath arrived on the scene, dental professionals’ experiences in the sterilization area greatly improved. We saved time, promoted safety, and minimized cross contamination. How so? Ultrasonic cleaning reduces the need for hand scrubbing and in turn, minimizes the risk of sharps injuries.
Ultrasonic cleaning is the process created by high frequency soundwaves combined with the cleaning solution. This results in cavitation action where millions of tiny bubbles are formed and then implode upon impact with an instrument surface. This action scours the tiny crevices to effectively clean debris from the instruments in preparation for sterilization.
Evaluating the use of the ultrasonic
First, ascertain that the ultrasonic unit currently in use is FDA regulated as a medical device, not merely as a jewelry cleaner. Obtain a copy and review the instructions for use. Based on the manufacturer’s instructions, you may need to degas the unit when new solution is added. Degassing the solution eliminates large air bubbles that interfere with the cleaning process.
The Centers for Disease Control and Prevention (CDC) recommends wearing puncture- and chemical-resistant utility gloves for instrument cleaning and decontamination procedures. Note that the CDC also recommends wearing PPE (e.g., mask, protective eyewear, and gown) when splashing or spraying is anticipated during cleaning and decontaminating.
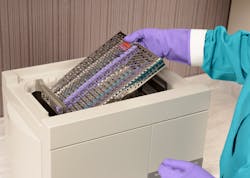
Place the cassette or the loose instruments in the basket. (Image 1)
If you cannot locate the basket, contact the unit manufacturer and reorder it right away. Avoid overfilling the basket with too many instruments. Never place objects directly on the bottom of the tank. Operate the unit with the lid in place to contain the aerosols.
Satisfy the recommended submersion time inside the unit in accordance with the manufacturer’s instructions. Unit cycle times can vary by manufacturer so be sure to confirm this. Upon removing the items, carefully inspect to ensure all debris is removed. If debris is still present, evaluate the conditions. For example, was the tank overfilled with instruments? Was the cleaning solution changed at least daily or more frequently if needed? Hand scrub instruments only when the automated process failed to remove stubborn debris.1 In our experience, this step is rarely necessary if the user adheres to the manufacturer’s instructions.
Instrument washers are another option for automated cleaning. Although not a substitute for heat sterilization, washer-disinfectants are highly effective in achieving high-level thermal disinfection.
More helpful procedures
Whether you utilize an ultrasonic bath or an instrument washer, test the units to ascertain that the equipment is functioning properly. Many of us were trained to test the ultrasonic unit with the foil test. This means you cut a piece of lightweight aluminum foil the width of the unit. Add fresh cleaning solution and degas the unit. Place the foil vertically into the tank and hold it toward the bottom without touching it. Hold the foil for approximately 20 seconds. The foil should have pitting and indentions to evidence the cavitation action. If the you do not see this on the foil, the unit is not functioning properly.
A great alternative to the foil test is a commercial monitor. I prefer using such monitors to eliminate user error in reading the test and to avoid the time constraints of having to deal with foil.
Hu-Friedy’s cleaning monitor is designed to monitor the efficacy of the cleaning process. (Image 2)
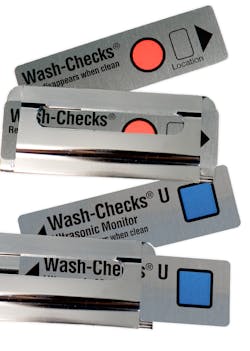
It contains a nontoxic test soil that mimics the presence of blood and tissue on an instrument surface. This test monitors parameters including cavitation, time, temperature, detergent amount, and the number of instruments in an ultrasonic. In a washer-disinfector, the test monitors the parameters of time, temperature, detergent concentration, spray arm function, and enzyme soak.
As a consultant, I suggest taking a digital photo of the results and incorporating the image in your quality control records. Follow the manufacturer’s instructions for frequency.
Not to be overlooked, don’t forget about the recommended cleaning and maintenance of the ultrasonic unit and dental instrument washer. Verify these instructions with the manufacturer to ensure optimal use and efficacy. In addition to ensuring the safety of employees, using an automatic cleaner and monitoring its performance is critical for successful sterilization, which is the cornerstone of patient safety.
So, when you’re in the sterilization area and you reach for a scrub brush, remember, you can’t touch this!
Editor's Note: Olivia Wann received an honorariam from Hu-Friedy for authorship of this article. All information and recommendations are consistent with Ms. Wann's normal course of clinical practice.
Reference
1.From Policy to Practice: OSAP’s Guide to the Guidelines, 2004 – 2012. Organization for Safety, Asepsis and Prevention. Pg. 49,
Olivia Wann founded Modern Practice Solutions in 2000. She graduated from the Nashville School of Law and continues to consult with dental practices on managing risk in a complex regulatory environment. Wann graduated magna cum laude from St. Joseph’s College of Maine with a Bachelor of Science in Health Care Administration. She spent her early years as a dental office manager and later served as a dental software support technician for SoftDent.
About the Author
Olivia Wann, JD, RDA
Olivia Wann founded Modern Practice Solutions in 2000. She graduated from the Nashville School of Law and continues to consult with dental practices on managing risk in a complex regulatory environment. Wann graduated magna cum laude from St. Joseph’s College of Maine with a Bachelor of Science in Health Care Administration. She spent her early years as a dental office manager and later served as a dental software support technician for SoftDent.