A closer look at Gradia Direct

By Kevin Winters, DDS
The advancement of dental materials continues at an almost lightspeed pace. It has become difficult for many practitioners to keep abreast of the many changes that take place almost daily. This article will attempt to give a report of a fantastic new direct composite material — Gradia Direct by GC Corporation. This micro-fine hybrid material is available in both anterior and posterior versions in multiple shades.
Gradia Direct is classified as a micro-fine hybrid resin composite with prepolymerised resin filler. These so-called colloidal systems, like Gradia Direct, are known in the clinical situation to have much-appreciated advantages in terms of esthetics, polishability, and wear resistance. The average particle size is .85 microns. The material itself uses urethane dimethacrylate (UDMA) and dimethacrylate co-monomers for its matrix.
Gradia Direct uses a combination of camphorquinone and amine as the catalyst for photoactivation. Light activation can be carried out with quartz halogen, plasma, or LED curing lights.
Physical property tests conducted by the company show Gradia Direct, anterior and posterior, to be very flexible materials (low modulus of elasticity). Wear resistence of Gradia Direct is higher than many microfilled composites and similar or higher than many hybrids. Gradia Direct surface smoothness is better than most hybrids and similar or slightly less than many microfills (testing results available from GC).
Esthetically, Gradia Direct has some very nice characteristics. The so-called "chameleon effect" — the ability of the material to blend in with its' surroundings — works very nicely with this material. Due to the variety of different particles, resin matrix, fumed silica, prepolymerised filler, silica and/or fluoro-alumino-silicate glass, the different interfaces with different optical properties and reflection of light allow the material to blend very nicely.
GC has introduced a shading concept with Gradia Direct that is unique. This material has three shade "groups." The standard shades are the basic Vita A, B, C, and cervical shades. Each shade possesses the same hue. These standard shades have a very delicate balance between value, translucency, hue, and chroma.
Special shades were developed to satisfy the need for high esthetics in demanding cases. Inside shades (AO2, AO3, AO4) have a higher opacity than standard shades. They can block out shine-through from the oral cavity. The opacity prevents the background color from making the restoration dark.
Outside shades are characterized by differences in translucency and value. Depending on the intended use, several shades are slightly pigmented to obtain a very specific hue and chroma. These shades give an extra dimension to the restoration. Over time, enamel changes from a thick (child) to a thin (older person) character. This change is accompanied by a change in value (less white, more black). To copy this change in value, WT (child), DT (adult), and GT (old) outside shades have been developed.
At the same time as the thickness decreases, the translucency of the enamel increases. To mimic this change at the incisal edges from adult to elderly patients, NT and CT have been developed. Another shade, CVT, has been developed for cervical areas to increase the vividness of Class V restorations.
GC also has a flowable composite (GC UniFil Flow) as well as a self-etching adhesive (UniFil Bond). These materials used in conjunction with Gradia Direct make for an outstanding, complete family of products for all of your composite needs.
Now that we have covered the basics of this great new product, let's look at some ways to incorporate it into your everyday practice. Most practitioners have common uses for their composite needs. Direct posterior fillings, anterior fillings, and, for some dentists who utilize more advanced cosmetic procedures, direct anterior veneers. We will go through each of these scenarios and show examples of how Gradia Direct can be utilized and how well it performs and handles.
Class II direct composite
Every day, we run across old and failing amalgams. It is the most common situation we see, with the exception of periodontal disease. I feel it is no longer indicated to replace these failed amalgams with more amalgam. The better choice, both esthetically and functionally, is to restore the tooth with a more conservative, bonded restoration.
Here is a perfect example of this situation, one in which we used the Gradia Direct family of materials (figure 1). This patient presented with a broken mesial buccal cusp on a tooth restored with an occlusal-lingual amalgam. The patient was presented with two options — an indirect onlay restoration and a direct composite. Advantages and disadvantages were discussed with the patient and she chose the direct filling due to financial concerns. Since the mesial-facial cusp is a non-functional cusp, longevity problems in this area should not be a concern.
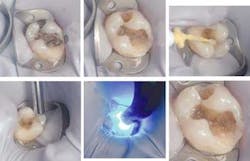
Bottom Row: Figures 4, 5 and 6
Along with rubber dam isolation, the amalgam is removed along with any residual decay underneath it. The preparation remains conservative and does not extend much beyond the existing cavosurface margins previously established (figure 2). After scrubbing the prepared surfaces with a chlorhexidine scrub and rinsing with water, UniFil Bond self-etching primer is applied to the enamel and dentin for 20 seconds undisturbed (figure 3). Next, a gentle air stream is applied for 5 seconds (figure 4), then UniFil Bond bonding agent is applied to all surfaces and light-cured (figure 5). What you will see now is a surface that is shiny and glistens (figure 6). Now we are ready to begin our incremental build-up with Gradia Direct.
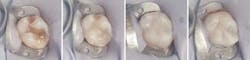
The first layer will be a shade A3.5 of UniFil Flow, a flowable composite. Many researchers have shown the benefits of placing a first layer of a flowable composite. This flowable creates a more intimate contact with all areas of the preparation floor, especially in box preparations. There is also research to prove it acts as a "shock absorber" for any effects from polymerization shrinkage (figure 7). Now we apply a dentin shade of A3 using Gradia Direct Posterior. This is placed in 2 mm increments following the cuspal designs of the tooth, each layer being individually cured (figure 8). With approximately 1.5-2 mm left before the occusal surface margin, we switch to the Posterior WT shade for the final occlusal build-up. This layer will not only be where our final anatomy is placed, but where the final hue, chroma, and value for the tooth will be realized (figure 9). The occlusal anatomy is now grossly carved with a carbide finishing bur to approximate the final design (figure 10). Once completed, the occlusion is checked, adjustments made, and the restoration smoothed and polished.
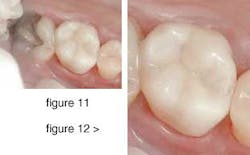
Look at the restoration of the almost natural state of the tooth (figure 11). The esthetics are unmistakably real. The color blend with the rest of the tooth is ideal. Occlusal anatomy follows the cuspal indications perfectly. When observed under magnification (figure 12), you can see how well the tooth and composite have been seamlessly joined.
Restoring an anterior cervical lesion

This patient presented with a central and lateral incisor with cervical lesions (figure 13). After removing decay and old composite, the enamel margins were beveled (figure 14). UniFil Bond was then applied with its self-etching primer. Following the same protocol as above, a liner of UniFil Flow was placed followed by shade A04 Gradia Direct Anterior. The body shade of A4 was placed next followed by the final outer layer of shade GT. The final results were outstanding (figure 15). Notice the amazing blend of the composite material with the tooth displaying the chameleon effects of Gradia Direct.
Handling the cosmetic patient — direct veneers
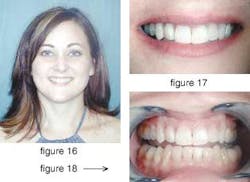
Not long ago, a lady came to my office inquiring about enhancing her smile (figure 16). Upon examination, her teeth revealed evidence of tetracycline discoloration (figure 17). The teeth presented with slight rotations, several interproximal "black triangles," and irregular tooth form shapes. The patient's main concerns were the color and the black triangles (figure 18). I presented her options of porcelain vs. composite veneers. For financial reasons, she chose composite.
The plan was then to prepare eight teeth for composite veneers. Our patient had decided on a very white, dazzling smile. She wanted to go as light as possible. My plan then became to use shade BW, bleach white, as my main color. To enhance the lifelike appearance desired, shade CT, clear translucent, was used in the incisal edge area to help create the incisal translucency.

Due to the tetracycline discoloration, I removed about .3 to .5mm of facial enamel extending the design into the interproximal elbow (figure 19). This is a key preparation technique to not have the difference in color of your tooth structure and restorative material standing out between the teeth. Each tooth was prepared and restored to completion before the next one was started. Irregular mammelon development was established within the BW composite then filled in and layered with the CT composite. Using composite finishing burs, the basic anatomy and outline forms were made. Composite polishing was then performed with much of it done with a polishing brush to help maintain surface anatomy and characterization. The author has found many systems, especially disc systems, flatten out the anatomy, making the surface too smooth.
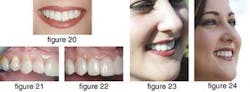
As you can see, we were able to give the patient the dazzling white smile she desired (figure 20). The change was dramatic to say the least. The black triangles have disappeared as well as any signs of rotation. When we look at closeups of the before-and-after results, you are able to see the characteristics of this new material (figures 21 and 22). Notice the natural incisal translucency, the ability to block out the underlying tetracycline discoloration, and the wonderful polishability. Our patient was ecstatic with the results (figures 23 and 24).
Gradia Direct is the latest addition by GC into the composite field. As you can see, this composite has multiple uses and can truly be considered a universal restorative material. Anterior and posterior teeth can now be predictably restored with one system. The esthetic results can be exquisite and I would anticipate the function and wear to be comparable.
Dr. Kevin Winters graduated from the University of Missouri-Kansas City in 1989. After completing a GPR at the University of Louisville-Humana Hospital, he opened a general practice in Claremore, Okla. After developing a successful general practice and being awarded the Young Dentist of the Year award in 1995, Dr. Winters transitioned his general practice to one that concentrates on esthetics and reconstruction. Dr. Winters is one of the original clinical instructors at the Las Vegas Institute. He also lectures and conducts seminars across the nation. Dr. Winters may be reached at (918) 341-4403 or by e-mail at [email protected].