Bonding Danville's Snowpost
Jeffrey C. Hoos, DMD, and Raymond L. Bertolotti, DDS
Danville's Snowpost is an esthetic, radiopaque, flexible composite post reinforced with silicium fibers, enriched with zirconia. Its silanated surface is ready for direct bonding with composites. There are no mechanical knurls or other unnecessary stress risers in the post. With a bending E- modulus about twice that of dentin but much less than metal, the Snowpost has excellent stress dissipating qualities. Its low axial E-modulus follows the movements of the tooth, avoiding tensions and minimizing the risk of root fracture. At the same time, the tapered Snowpost stiffens the coronal portion of a composite post and core buildup, minimizing the possibility of a crown becoming loosened around the margins.
There are many considerations for post bonding:
- Removing any eugenol in the prepared canal
- Need for light-free cure of bonding agents
- Stress transmission by complete bonding of all components
- Choice of composite for the core.
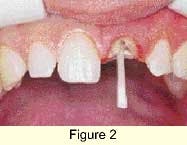
Step 1. A post is selected according to the size of the dedicated reamer used (figure 1). The dedicated reamer may be used as a "try-in post" to avoid contamination of the silanated post surface during a try-in (figure 2). By keeping the Snowpost clean, cleaning of the post can be avoided. Should the post become contaminated, decontamination can be done by applying phosphoric acid and then washing with water. It is not usually necessary to renew the silane.
Step 2. The canal is cleaned of eugenol by etching with phosphoric acid. Preferably a liquid phosphoric acid etchant is utilized since gels are not easily washed from the canal. Star Etch (Danville Materials) and Gluma Etch 35 Fluid (Heraeus Kulzer) are good examples of liquid etchants.
Step 3. After etching, washing, and drying the canal, a dual curing dentin bonding agent is used to seal and to bond composite to the etched canal. The authors prefer Clearfil Photo Bond (Kuraray America) since it is a dual curing "primer and bond". The Photo Bond is easily applied with a brush such as superfine Microbrush (Microbrush). The Photo Bond is air dried to evaporate solvents. The Photo Bond does not need to be light cured since it cures very well in the dark.
Step 4. Starfill 2B (Danville Materials) or another dual-curing or self-curing flowable composite is mixed on a pad and placed into the canal with a Needle Tube Centrix). Panavia F is another good choice of materials but beware that use of ED Primer with the Panavia F severely limits working time. Photo Bond is preferred to extend the Panavia F working time. When using Panavia F, it is preferred to coat the Snowpost with Panavia F rather than insert the Panavia in the canal.
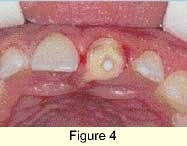
Step 5. The Snowpost is coated with Photo Bond (figure 3) and may be shortened with a rotary diamond at this time. It is inserted into the Starfill 2B already in the canal (figure 4). When using Panavia F, the Snowpost already coated with Panavia F is inserted in the canal. The Starfill 2B (or Panavia F) at the canal opening may be light cured at this time to stabilize the coronal portion while the dual cure occurs later inside the canal.
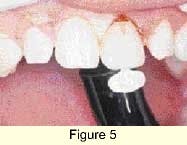
Step 6. Clearfil Photo Core (Kuraray America) is the preferred core material of the authors. Other auto cure, dual cure, or self cure core materials are compatible since the 2B (or Panavia F) is dual curing. The excess 2B (or Panavia F) is not removed from the canal entrance but instead the core composite is placed directly against the 2B (or Panavia F). If Photo Core is used, light cure it immediately after placing (figure 5). The Photo Core has an exceptionally deep light cure ability so it may normally be placed in only one increment.
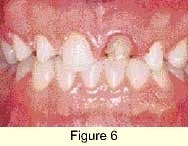
Step 7. After curing, the core is trimmed with a rotary diamond (figure 6) and impressions taken. If the Snowpost protrudes from the core, it is easily trimmed with the rotary diamond. Caution should be used to prevent inhalation of any fibers produced by trimming. Rubber dam isolation is ideal. The Photo Core is dentin shaded and difficult to see if cut wet. When cut dry, it becomes opaquish white and is easily differentiated from dentin.
Step 8. The resulting post, core and crown are is esthetic (figure 7) and all components are fully bonded and sealed. This type of core is believed to be the state of the art for esthetic and durable restorations of endodontically treated teeth (figure 8). The Snowpost is easily observed on X-ray.
For more information, contact:
Danville Materials
2021 Omega Road San Ramon, California 94583
(800) 822-9294 (925) 838-2793 Fax (925) 838-0944
All Danville Materials products are sold exclusively
through your dental supply company.
This procedure reflects the authors preferences for materials but the same principles apply to use of other systems.


