Immediate Load Implants
Achieving ideal esthetic results with dental implants is a challenge in the maxillary anterior region. Optimal implant position, sufficient volume of hard and soft tissues, and the presence of an interproximal papilla are essential. Although dental implants have been used for more than 40 years to replace missing teeth, current procedures are esthetically driven.
Initial studies and protocols advocated a two-stage surgical approach requiring the implant to be submerged and free-of-load to ensure predictable healing and osseointegration.1 This two-stage protocol, however, involves two surgical procedures, an extended healing period, and creates provisionalization challenges. As a result, immediate loading (provisionalization) of an implant at the time of placement has become a viable treatment option, particularly in the esthetic zone. When replacing one or two teeth in the anterior maxilla, provisionalization can be simplified by immediately loading the implant.
First, we need to review the steps in immediate loading of an implant. The implant may be placed into either an extraction socket or a healed site, an abutment (preferably a definitive, tooth-colored abutment) is attached, and a fixed provisional is placed. “Immediate load” may seem a misnomer as it is essential that there is no contact on the provisional in centric occlusion or excursive movements. Unlike an edentulous arch, where a minimum of four to six implants are splinted for cross-arch stabilization, in the anterior maxilla, it is usually a single, lone-standing implant.2
For this reason, we want to minimize any forces for the first eight weeks until secondary stability has occurred with a resultant higher bone-to-implant contact.3 Following adequate healing time, the definitive restoration is then fabricated.
Patient selection, as well as surgical skill and technique, influence the outcome of success. These factors, however, are relevant in any type of implant treatment modality and are not singularly important in immediate load. Factors that influence immediate load and the success of osseointegration are:
- Implant features
- Bone quality and quantity
- Initial stability
Implant features
Implant companies have modified implant designs to create implants with textured surfaces that increase area and with surface porosities that promote quicker bone formation. Secondary grooves increase the surface area and promote bone growth. In addition, implants are tapered to allow for initial stability into the apical bone. These modifications also allow for placement of implants in softer bone with greater initial stability.
Bone quality and quantity
The volume and density of the bone will determine whether an implant can be placed immediately or in a delayed approach. For example, following a tooth extraction, if there is insufficient bone or poor bone quality that does not allow for initial stabilization, then the site is grafted. Following adequate healing (four to six months), the implant is placed. A fixed provisional can then be attached at the time of implant placement during the second surgical procedure to immediately load. During the immediate-implant surgery, bone graft material may be placed between the implant and the walls of the extraction socket. This does not preclude placing a provisional as the implant is stabilized apically.
Initial stability
Initial stability is the key factor in deciding whether or not to load immediately. The implant should be well-anchored in the bone and able to withstand a tightening torque of 35 Ncm without further rotation in order to load.4 The stability is enhanced by selecting a tapered-screw implant with enhanced or modified grooves, an osseoconductive surface, and of sufficient length (a minimum of 10 to 13 mm). The principal requirement for immediate-loading success is initial stability.
Ostman et al. showed that there is no difference in implant success when comparing a two-stage approach to an implant that is loaded immediately as long as it is initially stable. The stability was measured by insertion torque and Resonance Frequency Analysis.5 RFA is a scientific method of measuring initial stability in which the value needs to be a minimum of 60 ISQ (Implant Stability Quotient) at placement in order to immediately load.
Crestal bone remodeling has been shown to be independent of whether or not the implant is loaded.6 There is no disadvantage with regard to success as long as the aforementioned factors are considered. There are several advantages to immediately loading an implant:
- There is only one surgical procedure for the patient.
- Treatment time is shortened as there is no need to uncover the implant.
- Fixed provisionalization is possible.
- There is the ability to sculpt soft tissues with a tooth form rather than a cylindrical healing abutment.
There are two disadvantages with the immediate-load procedure:
- It requires coordination between the surgeon and the restorative dentist, unless the same person is performing both.
- The definitive, tooth-colored abutment is somewhat difficult to prepare during the placement of the implant.
The surgical field provides less than ideal visibility, and there is concern that debris from the abutment preparation will become entrapped in the wound site. For this reason, most of the refining of the abutment should be done extraorally. When relining the provisional, limit the amount of acrylic to minimize the risk of excess material invading the surgical/graft area. Finally, take care when cementing the provisional to ensure that all excess cement is removed.
Peri-implant complex
There are metal and plastic temporary prefabricated abutments that can be attached at the time of implant placement. These abutments are prepable and simpler to use. Then why use a tooth-colored abutment? To answer this question, we must discuss the peri-implant complex and the relationship of the microgap, implant position, abutment dis/reconnection, and choice of abutment material.
The microgap is the minute gap at the junction of the implant surface and abutment connection. This creates a potential reservoir for bacterial proliferation and subsequent crestal bone loss. The microgap is believed to contribute to the crestal bone loss that occurs within the first year of implant placement that results in the first bone-to-implant contact occurring 1.5 to 2 mm below the implant shoulder.7 This bone loss stops during the first year once it has established a biologic width distance from the microgap. The osseous loss can lead to gingival recession and compromise the esthetics of the restoration.
When placing implants - immediately or delayed - be aware of the position of an implant relative to an adjacent implant or tooth in three dimensions. Disregarding these principles will lead to soft-tissue discrepancies that create less-than-optimal esthetic results.
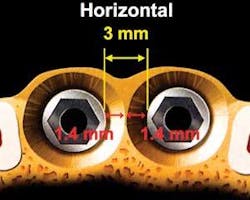
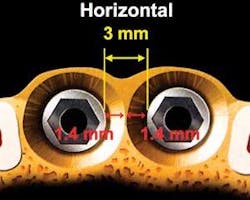
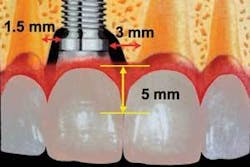
Several authors have shown that ideally, the minimum horizontal distance between adjacent implants should be 3 mm to compensate for the 1.3 to 1.4 mm of lateral bone loss that occurs around the circumference of an implant following placement8,9 (see Fig. 1). The ideal horizontal distance between a tooth and an implant is also 3 mm,8 but Esposito states that the minimum horizontal distance between a tooth and an implant is 1.5 mm10 (see Fig. 2). This measurement takes into consideration that there is lateral bone loss occurring around the implant, but not around the tooth. Should an implant be placed less than 1.5 mm from an adjacent tooth, the tooth will lose bone on the interproximal surface, which in turn leads to loss of the papilla.
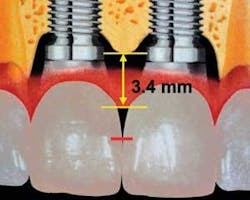
The preservation of the interdental papilla is essential for an ideal esthetic result. The supracrestal fibers hold the papilla coronally on a tooth. There are, however, no supracrestal fibers attaching to an implant. Thus, as long as the ideal horizontal spacing is maintained, the mean vertical height of the papilla (distance from the crest of bone to the tip of the papilla) between a tooth and an implant will be 5 mm, whereas the mean vertical height of the papilla between two implants will be 3.4 mm9,11 (see Fig. 3). This biologic limitation that occurs between two implants can be dealt with restoratively by creating a broader, longer contact area in the final restoration.
When a temporary or healing abutment is removed in fabricating a definitive restoration, there is disruption of the mucosal barrier that has formed. This disruption leads to epithelial proliferation and bone resorption.12 Connecting the definitive abutment at the time of implant placement eliminates the disruption of the mucosal barrier and maintains the integrity of the seal, thereby protecting against bacterial assault. When selecting options, understand the relationship between the chosen material and soft tissues. Titanium, zirconia, and alumina allow for epithelial and connective-tissue attachment to the abutment.13, 14 Gold and porcelain do not encourage soft-tissue attachment and result in gingival recession and bone resorption when used as abutment materials.14
Therefore, we prefer connecting a tooth-colored abutment (zirconia, alumina) at the time of implant placement for the following reasons:
- The soft tissues attach to the abutment and create a seal, which in turn makes the microgap obsolete.
- There is no need to change the abutment, so the mucosal barrier is never disrupted.
- The bone-to-implant contact is maintained at the implant shoulder because there the biologic width is established from the crown margin and not from the implant-abutment interface.
- Esthetically, it is preferable to have a tooth-colored abutment rather than a metal one that can result in a gray halo emanating from the soft tissue surrounding the restoration.
Case reports
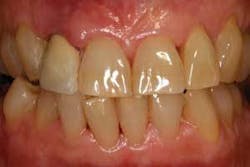
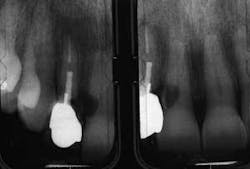
The first patient (see Image 1) was a 63-year-old, white female with no significant medical history. She presented with a buccal abscess between the maxillary right lateral and central incisors. Radiographically, there was evidence of a fracture and decay on the lateral and resorption on the central (see Image 2).
Both teeth were deemed hopeless and slated for extraction. Provisionalization was a challenge as the patient declined wearing a removable appliance, and the adjacent virgin teeth would have required preparation to support a fixed provisional. We elected to extract the teeth, place immediate implants with a narrow-diameter implant in the lateral position (see Image 3), graft between the implant and the extraction site, and place two prefabricated zirconia abutments, which were tightened to 35 Ncm (see Image 4).
The majority of the abutment preparation was performed extraorally. The provisional was relined and luted with a semi-permanent cement (Durelon). Centric and excursive contacts were removed. The patient was advised to adhere to a soft diet and avoid forces to the surgical site. When comparing the patient at the completion of the procedure (see Image 5) and six weeks postoperatively (see Image 6), the soft-tissue levels were maintained. The impression for the final prostheses was made six months following implant placement. Two single Procera AllCeram (Nobel Biocare AB) crowns were then fabricated.
The second patient was a 24-year-old Hispanic woman who complained of tissue tenderness between the maxillary right lateral and central incisors (see Image 7). The periapical radiograph revealed an area of resorption on the distal of the central incisor, which extended subcrestally (see Image 8). Rather than extract the tooth and place an immediate implant, we force erupted the tooth to bring the bony housing coronally. This allowed placement of the implant in a more ideal position. Had the tooth not been force erupted, then the implant would have been submerged further apically at the time of placement. This would have resulted in a longer restoration and uneven gingival margins, which would have been unacceptable with this patient’s high smile line.
Following completion of orthodontic therapy, the tooth was extracted, the implant was placed, and the prefabricated alumina abutment was attached (see Image 9). The site was allowed to heal for three months with resultant pink, scalloped tissue with preservation of both interproximal papillae (see Image 10). A final impression was made and a Procera AllCeram (Nobel BioCare AB) restoration was fabricated (see Image 11). Five years postoperatively, the osseous levels have been maintained (see Image 12).
Conclusion
The advances in implant design enables a shortened treatment time without compromised esthetic results. Immediate loading of implants decreases the length of treatment, eliminates the need for removable appliances, and enhances esthetics by helping to maintain soft- and hard-tissue levels. Reviewing the steps in immediate load:
- Place an implant in the proper position, ideally 3 mm away from an adjacent tooth or implant.
- Verify initial stability (35 Ncm of insertion torque or an RFA value of 60 ISQ).
- Place a definitive, tooth-colored abutment. Complete the majority of the preparation extraorally.
- Place a provisional with no occlusal contact in centric or excursive movements.
Patient selection, operator skill, implant features, implant position, bone quality and quantity, initial stability, and occlusal design are significant factors in success. If the guidelines discussed are followed, then the restorative treatment is simplified and the esthetic result optimized.
References
- Adell R, Lekholm U, Rockler B, et al.: A 15-year study of osseointegrated implants in the treatment of the edentulous jaw. International Journal of Oral Surgery 1981;10: 387-416.
- Eriksson I, Randow K, Nilner K, et al.: Early functional loading of Branemark dental implants: 5-year clinical follow-up study. Clinical Implant Dentistry and Related Research 2000b; 2:70-77.
- Barewal R, Oates T, Meredith N, et al.: Resonance Frequency Measurement of Implant Stability In Vivo on Implants with a Sandblasted and Acid-Etched Surface. Int J Oral & Maxillofac Implants 2003;18:641-651.
- Maló P, Rangert B, Dvarsater L: Immediate function of Branemark implants in the esthetic zone: a retrospective clinical study with 6 months to 4 years of follow-up. Clinical Implant Dentistry and Related Research 2002; 13:281-287.
- Ostman PO, Sennerby L: Direct implant loading in the edentulous maxilla using a bone density-adapted surgical protocol and primary implant stability criteria for inclusion. Clin Implan Dent Relat Res 2005; Supplement:S60-69.
- Cochran DL, HJ, Schenk RK, et al.: Biologic width around titanium implants. A histomeric analysis of the implanto-gingival junction around unloaded and loaded nonsubmerged implants in the canine mandible. J Periodontal 1997;68:186-198.
- Hermann JS, BD, Schenk R, et al.: Biologic width around implants: A physiologically formed and stable dimension over time. Clin Oral Impl Res 2000;11:1-11.
- Gastaldo JF, CP, Sendyk WR: Effect of the vertical and horizontal distances between adjacent implants and between a tooth and an implant on the incidence of the interproximal papilla. J Periodont 2004;75(9):1242-1246.
- Tarnow D, Cho SC, Wallace S: Distance between implants. The effect of inter-implant distance on the height of the inter-implant bone crest. J Periodont 2000;71:546-549.
- Esposito M, EA, Grondahl K: Radiological evaluation of marginal bone loss at tooth surfaces facing single Branemark implants. Clin Oral Impl Res 1993;4(3):151-157.
- Choquet V, Hermans M, et al.: Clinical and radiographic evaluation of the papilla level adjacent to single-tooth dental implants. A retrospective study in the maxillary anterior region. J Periodontal 2001;72:1364-1371.
- Abrahamsson I, Berglundh T, Lindhe J: The mucosal barrier following abutment dis/reconnection. An experimental study in dogs. J Clin Periodontal 1997;24:568-572.
- Abrahamsson I, Berglundh T, Glantz PO, et al.: The mucosal attachment at different abutments. An experimental study in dogs. J Clin Periodontal 1998;25:721-727.
- Thomsen P, Larsson C, Ericson LE, et al.: Structure of the interface between rabbit cortical bone and implants of gold, zirconium and titanium. Journal of Materials Science: Materials in Medicine. 1997;8:653-665.
