10 tips for long-term success of removable implant-retained dentures
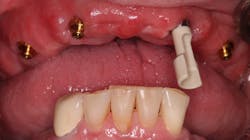
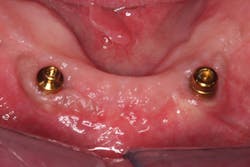
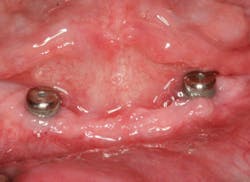
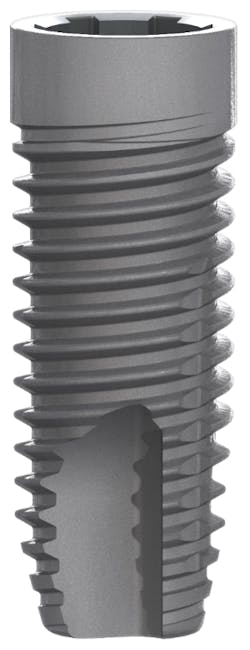
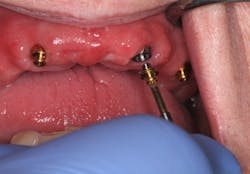
Fixed implant-supported bridges are becoming more prevalent worldwide. There are multiple types of bridges available, but all are expensive, and they require advanced clinical skills. Although these fixed bridges are a wonderful service to offer, we should remember the value of removable implant-retained dentures (figure 1). Attachments, such as Locator by Zest and Equator by Rhein83, have many benefits. They are the most affordable, least complicated, easiest to repair, and easiest to clean full-arch implant option.
There is a downside though. These dental implants have a higher failure rate than fixed implant options.1 However, if you follow these 10 tips, you and your patients will enjoy long-term success.
I have organized this article into three subsections for easier reference:
- Understanding and managing forces
- Selecting the best systems for success
- Hygiene and maintenance
Understanding and managing forces
Tip no. 1: Understand torque and bending moments
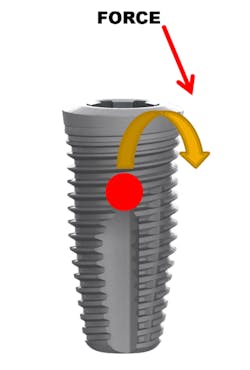
Torque on a dental implant is calculated by multiplying the vector of force applied when biting by the distance of that line to the center of rotation on the implant (T = F x D) (figure 2).2 Although it is not practical to calculate this number for any given implant case, it is important to understand and apply the concept. As the applied force moves away from the implant, the torque increases and causes a "bending moment" (figure 3). In a bending moment, the implant is attempting to rotate around the center of rotation. This results in force on the implant, abutment screw, and surrounding crestal bone. If the force is high enough or constant enough, it can result in bone loss, abutment loosening, and even implant fracture.

Here are three ways to minimize torque and bending moments:
- Do not exceed implant angulation to the opposing force by more than 20 degrees.3
- Use the shortest Locator or Equator abutment possible. Excessive abutment height will increase torque when lateral force is applied.4
- Keep abutment heights the same to prevent uneven implant stress and wear of attachments.4
Tip no. 2: Maximize tissue and tooth support
You can minimize torque on implants by maximizing the amount of soft-tissue contact a full denture has.4 Do not remove the palate from an upper full denture unless the remaining ridge is very substantial. I might remove approximately 1 cm of acrylic in the postdam seal area since it is no longer needed for retention, but too much palatal relief risks increasing the lateral load on the implants. For similar reasons, avoid overreducing flanges.
With cast metal partial dentures, you can intimately fit the metal framework to the lingual surfaces of remaining teeth to minimize lateral forces.
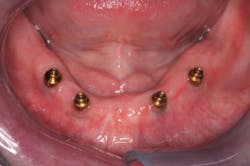
Tip no. 3: Use more implants
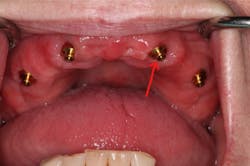
It is widely noted that a minimum of two implants are required in the mandible for removable dentures.5 Four or more implants are optimal for the maxilla.6 These minimums can be successful more than 85% of the time, but long-term success can be increased by adding additional implants (figure 4).7 Balaguer et al. studied 95 patients over an average of six to nine years and found that survival rate in the maxilla of four implants was 85.7%. Survival rate of six implants was 100%. In the mandible, survival rate of two implants was 96.6%, whereas survival rate for three implants was 100% and survival rate for four implants was 99%.7
Adding additional implants reduces stress on each individual implant. In most cases, it helps ensure that if an implant is lost, there will be enough remaining implants for a successful case. In the mandible, additional implants will increase retention and, therefore, patient satisfaction. We offer financial incentives for our patients to add additional implants. It’s a win-win. Our patients enjoy greater security and success, and we invest less clinical time on adjustments and addressing complications.
Tip no. 4: Select ideal implant positions
Choosing ideal implant positions reduces stress on the implants and lessens complications. A consensus on the ideal positions in the maxilla is difficult to find, but in both maxillary and mandibular arches, the implants should be equidistant from the midline and evenly spaced.8,9
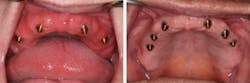
For two mandibular implants, place the implants in the positions of the canines or lateral incisors. Implants distal to the canines will be posterior to the anterior fulcrum line, which will result in more stress on the implants. For three implants, ideally place them at the midline and in the canine positions. Four implants should be placed at the sites of the lateral incisors and the first bicuspids.10
Selecting the best systems for success
Tip no. 5: Select systems to minimize future complications
It is important to select implant and attachment systems that offer a wide variety of restorative options and that are designed to perform the best with removable denture cases.
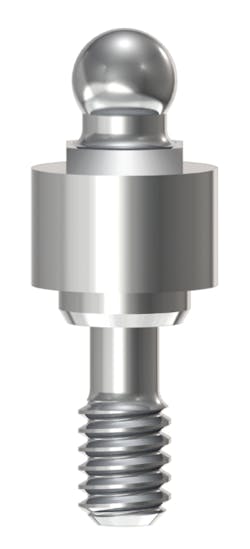
Ball attachments (figure 5) have been available for decades. They are still popular, and they offer a viable option for denture retention. However, I prefer not to use them. I have found that the O-rings wear more rapidly than the Equator and the Locator (figure 6). That isn’t a huge factor, but vertical space is. Ball attachments require 10–12 mm from the soft tissue to the occlusal plane, whereas Locators require 8.5 mm and Equators require 8.1 mm.11 I try to maintain as much crestal bone as possible for support of the denture, and this often limits vertical space. My favorite attachment is the Equator from Rhein83. I gain similar retentive strength to the Locator, but the metal housing is 1 mm narrower; this allows for thicker surrounding acrylic and less incidence of acrylic fracture.
My favorite implant system for removable dentures is Neoss (figure 8). The top 2 mm of the collar is acid-etched only for low roughness (Sa 0.4), so it osseointegrates well but retains minimal plaque if it becomes exposed. This system is compatible with Equators, Locators, and ball attachments, and there is a 3.25 mm implant that accepts the Equator abutment for narrow ridges. I also love the Access Abutment by Neoss, which simplifies paralleling the attachments. I will discuss this in the next section.
Tip no. 6: Keep implants as parallel as possible
Keep the dental implants as parallel as possible to minimize bending moments on any off-angle implants. CAD planning and surgical guides can aid in keeping the implants parallel. Parallelism will also keep the path of insertion over each attachment similar. This is beneficial, because as the path of insertion diverges, wear on the abutment and retentive nylon increases. If the path of insertion becomes excessive, it is possible to pull the nylon out of the metal housing and break the metal housing from the denture.
In some cases, especially in the maxilla, the topography of the bone makes paralleling the implants difficult. In these cases, I treatment plan additional implants to reduce bending moments. I also use an angle-correction abutment to improve the path of insertion.
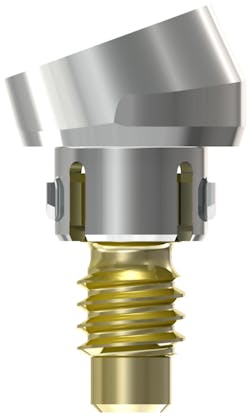
In my practice, the component that has had the most impact on lessening post-op headaches with removable cases is the Access Abutment by Neoss (figure 9). This abutment is available in angulations of 0, 10, 20, and 30 degrees, and they offer an Equator attachment for it that has a 0.5 mm collar (1.5 mm is also available). I use this abutment frequently to improve the path of insertion (figures 10–14). In fact, I use it so frequently that in maxillary cases, I plan one for every other implant in the treatment plan. It’s easy to offer a refund if I don’t need it, and this way, I avoid having to add additional fees once the case is started.
Tip no. 7: Beware of mini-implants
Mini-implants are popular due to their ease of placement and lower cost, but I recommend caution when offering these as a final treatment option. The narrow width of the implants versus conventional endosseous implants significantly reduces implant surface area12 and significantly increases crestal bone stress (figure 15).13 Failure rates are higher in mini-implants than in conventional implants,14 with up to 20% of these failures coming from implant fracture.15
One advantage of mini-implants is their ability to be used without grafting in narrow ridges. In such cases, I would recommend the 3.25 mm two-piece implants from Neoss or the 3.3 mm two-piece implants from Nobel Biocare. Another advantage of mini-implants is the lower cost of the implant and abutment combination. In these cases, I would recommend Neodent implants with the NeoPoros surface from Straumann. Equators are available for these implants, and they cost less than $150 in bulk. Neodent also has a two-piece Facility implant with a tap-in Equator that is inexpensive and 2.9 mm wide.
Use of mini-implants is a decision that should be made between individual clinicians and their patients. However, I recommend considering the following list of positives and negatives prior to selecting mini-implants as a long-term restorative option.
Positives:
- You can use mini-implants in narrow mandibular ridges without grafting.
- Mini-implants are good immediate provisional implants.
Negatives:
- Mini-implants have a higher failure rate than conventional endosseous implants.
- The narrow width of mini-implants increases crestal bone loss and fixture fracture.
- In most cases, the collar height of mini-implants cannot be adjusted.
- For one-piece mini-implants, worn attachments require the implant to be extracted versus replacing the attachment.
- Initial costs are low with mini-implants, but costs associated with failure can be high.
- Fractured mini-implants are difficult to remove.
- Mini-implants can’t be tested with Resonance Frequency Analysis (RFA) devices (Osstell) to check stability.
- Screw-in angled abutments aren’t available with mini-implants.
Hygiene and maintenance
Tip no. 8: Maintain regular recall
Maintenance of dental implants may be one of the most overlooked aspects by both dentists and patients. Many patients perceive their need for treatment as complete once their implants and denture are delivered. The average denture wearer sees a dentist or denturist approximately every 14.8 years after receiving their denture.17
I tell my patients that "implants are teeth," so they must continue with their recall visits for a lifetime. I recommend a minimum of two visits per year with increased frequency as needed. Peri-implant mucositis (similar to gingivitis with teeth) commonly develops between recall appointments. Many denture-wearing patients fail to clean their implant abutments and dentures adequately. Recall visits are an opportune time to evaluate the success of your patients' home care and coach them to properly maintain their implants. Peri-implant mucositis is a precursor to peri-implantitis (similar to periodontal disease with teeth). Peri-implantitis is critical to get under control if it occurs; otherwise, the implants will be lost.
I recommend the following hygiene maintenance protocol for removable implant-retained dentures:
- A minimum of two cleanings per year
- Probe the implants at recall visits
- Radiographs of the implants once a year
- Photograph areas of concern for future comparison
- Change worn nylon attachments at recall visits
- Check the need for relines once a year
Tip no. 9: Reline frequently
As discussed earlier, an intimate fit of the denture acrylic to the soft tissue will minimize stress on the implants. Jemt et al. showed that 24% of new mandibular dentures require relines after one year due to residual ridge resorption under the distal extensions.18 Smedberg et al. showed that 40% of maxillary dentures require relines within three years.19
The problem is that patients often won’t know if their denture needs a reline, since the implant attachments stabilize the denture. I recommend checking once a year for the need to reline the denture. I use the following techniques.
Technique for determining the need for a reline—mandible:
I place my thumbs along the occlusal table from the canines to the molars and press down repeatedly on the denture. If I feel a soft "squish," then I know there is soft-tissue support, and a reline is not indicated. If I feel solid contact on an abutment, or if I can’t feel a "squish," I follow the protocol for the maxilla.
Technique for determining the need for a reline—maxilla:
Since a minimum of four implants are in place, it is very difficult to feel a "squish." Instead, I line the inside of the denture with light-body impression material, seat the denture on the abutments, and remove the denture after the material sets. Probe the impression material in multiple locations (figures 16–18). If probing is shallow and consistent through the denture, a reline is not indicated. If any areas are deeper, a reline is indicated. Note: The attachments are clearly visible in Figures 17 and 18, but often a thin layer of impression material will cover them.


Tip no. 10: Replace implants prior to failure
My last tip is to replace implants that are on the path to failure before they fail. There is no doubt that this can be a difficult conversation with an existing patient, but being preemptive helps to maintain bone at the desired implant site. When implants supporting a denture fail, it is common to lose all surrounding bone—not only mesial and distal, but the buccal and lingual plates too. This makes replacing the implant in the optimized location very difficult. Once it is assessed that failure is likely, removing an implant early on makes immediate replacement in the same site possible. Any required grafting is easier and less costly due to the higher bone volume. My guideline is that if more than one-third of the implant is supracrestal, I will replace it. This is based on my clinical values and experience—not on any clinical studies—but this guideline may be helpful for you.
I hope these tips help make your removable implant cases more successful.
Author’s note: My recommendation of products is genuine, and I did not receive any compensation for this article or these suggestions. Any implant system you use that satisfies similar needs should be adequate.
References
- Seo YH, Bae EB, Kim JW, et al. Clinical evaluation of mandibular implant overdentures via Locator implant attachment and Locator bar attachment. J Adv Prosthodont. 2016;8(4):313-320. doi:10.4047/jap.2016.8.4.313.
- Weinberg LA. Atlas of Tooth- and Implant-Supported Prosthodontics. Batavia, IL: Quintessence Publishing Co; 2003: 48.
- Prosthetic considerations during implant treatment planning. In: Hupp JR, ed. Introduction to Implant Dentistry: A Student Guide. J Oral Maxillofac Surg. 2017;75(suppl 2):21. https://www.joms.org/pb/assets/raw/Health%20Advance/journals/yjoms/YJOMS752S.pdf.
- Mericske-Stern R, Geering AH, Burgin WB, Graf H. Three-dimensional force measurements on mandibular implants supporting overdentures. Int J Oral Maxillofac Implants. 1992;7(2):185-194.
- Thomason JM. The McGill consensus statement on overdentures. Mandibular 2-implant overdentures as first choice standard of care for edentulous patients. Eur J Prosthodont Restor Dent. 2002;10(3):95-96.
- Eckert SE, Carr AB. Implant-retained maxillary overdentures. Dent Clin North Am. 2004;48(3):585-601. doi:10.1016/j.cden.2004.03.004.
- Balaguer J, Ata-Ali J, Peñarrocha-Oltra D, Garcia B, Peñarrocha-Diago M. Long-term survival rates of implants supporting overdentures. J Oral Implantol. 2015;41(2):173-177. doi:10.1563/AAID-JOI-D-12-00178.
- Resnick RR, Misch CE. Misch’s Avoiding Complications in Oral Implantology. Maryland Heights, MO: Mosby Inc; 2017: 597.
- Laurito D, Lamazza L, Spink MJ, De Biase A. Tissue-supported dental implant prosthesis (overdenture): the search for the ideal protocol. A literature review. Ann Stomatol (Roma). 2012;3(1):2-10.
- Resnick RR, Misch CE. Misch’s Avoiding Complications in Oral Implantology. Maryland Heights, MO: Mosby Inc; 2017: 594-595.
- Siddharth Bonsal, Meena A Aras, Vidya Chitre. Guidelines for treatment planning of mandibular implant overdenture. J Dent Implants. 2014;4(1)86-90. doi:10.4103/0974-6781.131014.
- Misch CE. Contemporary Implant Dentistry. 3rd ed. Maryland Heights, MO: Mosby Inc; 2007: 87.
- Himmlová L, Dostálová T, Kácovský A, Konvicková S. Influence of implant length and diameter on stress distribution: a finite element analysis. J Prosthet Dent. 2004;91(1):20-25.
- Ellis JS, Seymour RA, Steele JG, Robertson P, Butler TJ, Thomason JM. Prevalence of gingival overgrowth induced by calcium blockers: a community-based study. J Periodontol. 1999;70(1):63-67. doi:10.1902/jop.1999.70.1.63.
- Alsaadi G, Quirynen M, Komárek A, van Steenberghe D. Impact of local and systemic factors on the incidence of late oral implant loss. Clin Oral Implants Res.2008;19(7):670-676.
- Anitua E, Errazquin JM, de Pedro J, Barrio P, Begoña L, Orive G. Clinical evaluation of Tiny 2.5- and 3.0-mm narrow-diameter implants as definitive implants in different clinical situations: a retrospective cohort study. Eur J Oral Implantol. 2010;3(4):315-322.
- Resnick RR, Misch CE. Misch’s Avoiding Complications in Oral Implantology. Maryland Heights, MO: Mosby Inc; 2017: 580.
- Jemt T, Book K, Lindén B, Urde G. Failures and complications in 92 consecutively inserted overdentures supported by Brånemark implants in severely resorbed edentulous maxillae: a study from prosthetic treatment to first annual check-up. Int J Oral Maxillofac Implants. 1992;7(2):162-167.
- Smedberg JI, Lothigius E, Bodin I, Frykholm A, Nilner K. A clinical and radiological two-year follow-up study of maxillary overdentures on osseointegrated implants. Clin Oral Implants Res. 1993;4(1):39-46.

About the Author

John A. Hodges, DDS, FICOI
John A. Hodges, DDS, FICOI, graduated from the University of Southern California Dental School in 1993. He runs a practice dedicated solely to dental implant services in Covington, Washington. Dr. Hodges lectures nationally for Neoss and Nobel Biocare on subjects including full-arch implant prosthetics, restorative complications, and Locators. He completed the fellowship program at the California Implant Institute, has restored hundreds of fixed full-arch implant restorations, is a Nobel Biocare CAD-certified technician, and is a fellow of the International Congress of Oral Implantologists. Contact him through his website.