8 safe and effective exercises for dental professionals

Dental professionals place their bodies in static, awkward positions all day long. Rounded shoulders, forward head, and elevated arms can cause muscle imbalances and damage to the body. As a result, some muscles become overworked, tight, and even weak. To counter those weakened muscles requires a tremendous need for strength training. Additionally, endurance of the shoulder girdle, rotator cuff, and core are important for supporting a healthy posture.
Stretching tight and overworked muscles is critical for flexibility and mobility. Ideally, you should stretch after you’re properly warmed up. If done consistently, the following exercises will help strengthen any muscle imbalances you have. As a precaution, if you have been experiencing pain, first consult with your primary care physician before attempting any of these exercises.

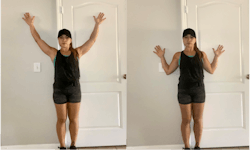
No. 1: Wall slides (figure 1)
Stand as close as you can against a wall with your heels, glutes, upper back, forearms, and elbows all in contact with the wall. Engage your core and bring your arms over your head. Squeeze your shoulder blades together and down and try to keep them engaged. Keep all points of contact against the wall the entire time. From there, lower your arms until they form a V shape, sliding slowly from beginning of movement until the end. Repeat for 10 repetitions once or twice a day.
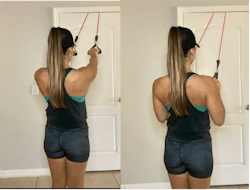
No. 2: Lat pulldown with band or cable (figure 2)
For this exercise, you can use a resistance band at home, or most gym facilities own a cable machine (first start with light to moderate weight and work up to a comfortable weight). Anchor a resistance band in a door frame or a safe, stable area above your head. With your palms facing out, pull the band down slowly with a two-second hold at the bottom. Squeeze shoulder blades together and down. Make sure your core is engaged and your chin is tucked. Do this exercise for 10 repetitions two to three times per week.
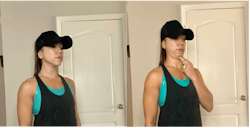
No. 3: Chin tucks (figure 3)
Start by slightly protruding/extending your neck and chin outward, and then slowly bring it back in an exaggerated tuck. You want your earlobes in line with your shoulders. Hold the chin tuck for three to five seconds.
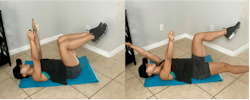
No. 4: Plank (figure 4)
Bring your body to a prone position and stabilize yourself on your elbows and forearms. Try to keep your hips in line with your shoulders and hold for 20 to 30 seconds at a time.

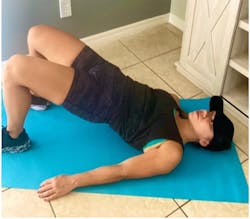
No. 5: Dead bug (figure 5)
Lie down flat on your back in a tabletop position. Keep you lower back pressed into the ground. Extend one arm back behind you and extend the opposite leg toward the ground. Hold for 10 to 20 seconds before switching sides.
No. 6: Side plank (figure 6)
Lie on your side with your feet stacked and forearm on the ground with your elbow under your shoulder. Brace your abs and squeeze your glutes, lift your body off the floor, and make sure your spine is aligned. Try to hold that position for as long as possible, and then switch sides. Hold for 10 to 20 seconds.
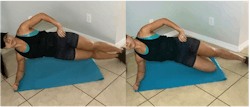
No. 7: Floor bridge (figure 7)
Start by lying on your back with your knees bent at 90 degrees and feet flat on the floor. Squeeze your glutes and raise your hips off the ground. Keep raising your hips until they are in line with your shoulders and knees. Hold for two seconds at the top of the movement. The second picture shows a modified version.
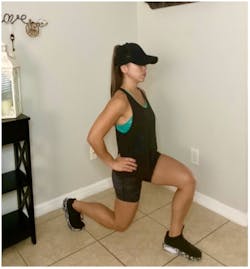
No. 8: Reverse lunges (figure 8)
Start in a standing position with your feet shoulder-width apart. From there, take one big step back with one leg, bend it in a 90-degree angle, and keep the heel of your foot lifted. The front leg thigh should be parallel to the floor with your foot planted. Alternate legs.
Editor’s note: This article first appeared in Through the Loupes newsletter, a publication of the Endeavor Business Media Dental Group. Read more articles and subscribe to Through the Loupes.
Source
- Valachi B. Practice Dentistry Pain-Free: Evidence-Based Strategies to Prevent Pain and Extend Your Career. Posturedontics Press; 2008.
About the Author
Christina Lopez, CRDH, CPT
Christina Lopez, CRDH, CPT, a dental hygienist in Odessa, Florida, has been practicing for six years. She is a certified personal trainer, and fitness is a passion of hers along with dentistry. She loves educating patients and the public on preventive oral-systemic care, and she’s a big advocate of overall health with a focus on body mechanics, ergonomics, and wellness through exercise and nutrition. Contact her at liftwithlopez.com or on Instagram @dumbbellsmeetdentistry.
Updated November 14, 2022