Anatomy of a smile makeover
By Lorin Berland, DDS
Transforming less-than-perfect dentition into a stunning, superstar smile is a source of immense gratification for the cosmetic dentist. Cosmetic and restorative dentistry restores and improves the health and integrity of the patient's dentition and, just as importantly, can improve the patient's self-image. Today, to be truly cosmetic, dentists must be clinicians, artists, and communicators. To achieve success in all of these areas, the dentist must pay close attention to every detail, from initial patient consultation through treatment planning, treatment, and follow-up care.
In the past, failures of cosmetic cases were frequently due to inadequately meeting the patient's expectations. By utilizing new technology such as smile selection guides, cosmetic imaging, and temporization techniques — thus creating a "trial smile" — you can reduce this problem and greatly increase patient satisfaction.
In both the esthetic and restorative aspects of dentistry, the dentist is responsible for the patient's functional and appearance-related needs. However, successful treatment planning first involves listening to the patient's desires and concerns as you evaluate his or her needs, be it color, shape, or tooth position. To move toward building a successful case, you must identify the patient's expectations during your diagnosis and treatment planning.
A pleasing, attractive smile can be attributed to the harmony of color, contour, size, occlusal plane, incisal edges, and midline with the patient's facial features. Often, this harmony can be achieved by treating just the four incisors, the key players in the smile zone. By enhancing their length, width, shape, and alignment, many times you can create a dazzling smile from imperfect teeth. The key to treatment success is creating the smile that the patient wants, not just what you would design. I have found computerized cosmetic imaging to be an essential tool to show patients how they would look with an improved smile — even before any treatment is begun. To maximize this tool, we allow patients to help design their smiles using Smile Shape and Length Selection Guides, and letting them visualize the final result. This generates much enthusiasm and excitement, which increases case acceptance, and facilitates the communication necessary to build a successful case right from the start.
Diagnosis
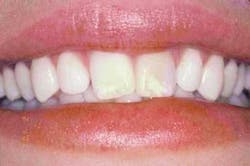
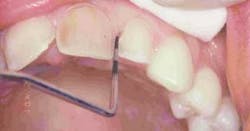
A 26-year-old female wanted a beautiful smile in time for her upcoming wedding. Tooth No. 9 (Figure 1), had been traumatized early in life and treated with root-canal therapy. It was now darkly discolored. The two centrals had large, unsightly white demineralization marks and were misaligned, mainly due to a space and size discrepancy. The short lengths of the two laterals accentuated the skinny, "rabbit-shaped" appearance of the central incisors, increasing the illusion of their incisal thirds being the same width as the gingival third. Furthermore, due to the malalignment and shape, the gumline was uneven with inflamed interproximal gingiva.
null
Smile Library and cosmetic imaging
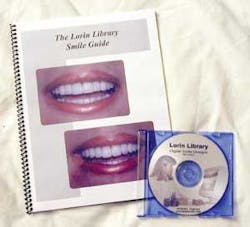
Smile libraries are useful communication and cosmetic diagnostic tools. I place a copy of the Lorin Library Smile Style Guide (Figure 2) in the waiting room and in each operatory to encourage patients to thumb through, even if the initial goal of their dental visit is not cosmetic-related. For this cosmetic consultation, I helped the patient determine her own cuspid shape (pointed), then showed her (with close up-front and side views) the six variations of incisor shapes as they would appear with her natural canines. This step is invaluable for enabling patient participation in the smile design.
null
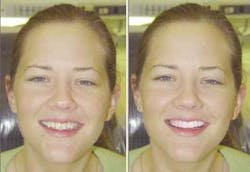
The next step is the selection of the relative incisal length from the four variations presented in the Smile Style Guide. In this case, the patient found Smile Design #LL12 (square/round centrals, square round laterals) and Length Code No. 4 (long centrals). We then took a full-face digital picture and used it along with her smile guide selection to simulate her proposed smile makeover using our in-office digital imaging system (Digital Dentist). Using a digital smile library enables dentists or dental assistants to simply drag-and-drop the chosen smile design into their patient's portrait images, allowing quick and effective imaging to be completed in minutes while the patient waits. Digital imaging used with a properly formatted digital smile library provides a quick and easy way to improve diagnosis and treatment planning, increase case acceptance, and provide en-hanced dentist/patient/laboratory communication.
The Lorin Library Smile Style Guide displays 18 smile designs that provide a visual aid for smile shape selection. The digital version is used for cosmetic imaging. The Lorin Library enables the dentist to guide the patient in the selection and design of the appropriate smile. Used with or without cosmetic imaging, such smile libraries can provide a powerful tool in case presentation, increasing patient acceptance and satisfaction.
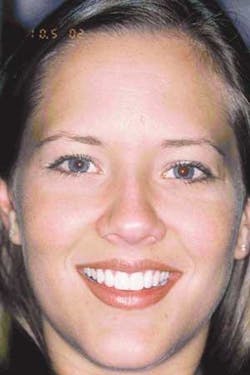
While our patient was having her teeth cleaned, my assistant simulated her new smile, demonstrating how whitening and the selected smile design would look on the portrait photo (Figure 3). At the end of the appointment, we gave the patient a current photo and a cosmetically enhanced smile printed on photo-quality Kodak paper. This visual aid not only allowed the patient to envision herself with straight, perfect white teeth, but also enabled her to share it with friends, family, and her fiancé! She was now anxious to get started to achieve the improvements shown in her smile-enhancement photo. Treatment began with whitening her teeth, and would be followed by inserting a bonded post in the endodontically treated tooth No. 9, and placing porcelain restorations on the four maxillary incisors.
null
Whitening
In order to achieve her most natural whiteness before continuing with the cosmetic treatment, the in-office Rembrandt and Lightening Plus whitening system was used. We first placed a cheek retractor and protected her soft tissues with a liquid rubber dam. The Rembrandt hydrogen peroxide whitening gel was then applied, and the DenMat Sapphire Xenon Power Arc light with the dual arch whitening crystal was positioned over the teeth to activate the gel for 20 minutes. This process was repeated for another 20-minute session. During this first appointment, her teeth had whitened from A-3 to B-1. Tooth No. 9 was still considerably darker, and the demineralization marks were even more distinct. We were ready to continue with restorative treatment.
Pre-operatory labwork
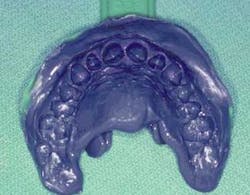
Maxillary and mandibular alginate impressions were taken and poured up in stone. The pre-operative models, cosmetic simulation, and a bite registration were sent to the laboratory for the fabrication of diagnostic wax-ups. The diagnostic wax-up shows any changes to be made in the contour and width of the abutment teeth. The incisors were lengthened and reshaped in ivory wax as directed by the digital images. The wax-up was then duplicated to facilitate the manufacture of a preparation guide and a hard/soft matrix. Together, the image-inspired wax-up and the simulated picture allow the dentist and the patient to see how treatment will look when finished. These two tools provide the accurate communication between the dentist and the laboratory necessary to obtain superior esthetic and functional results. Once the patient has approved the cosmetic image and the wax-up, the dentist is on his way to providing transitional and final restorations that will fulfill the patient's esthetic desires.
Shade selection
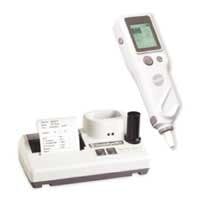
The key to successful shade-matching and duplication lies in following a standardized process and utilizing the advanced technology available, including shade-taking devices and digital photography. The Shofu Shade Eye-NCC (Figure 4) is a highly accurate, electronic shade-taking device that deduces the base shade of the tooth to be measured and provides a printout with information of that shade, value, and hue. It can be used with any porcelain system, but actually prints out an exact porcelain recipe for use with the Shofu Vintage Halo porcelain. By communicating this information to the laboratory for duplication, you can create accurate, realistic restorations that are indiscernible from its natural adjacent dentition. This is practically foolproof when you accompany the recipe with a digital photograph that captures the appropriate shade tab next to the teeth to be matched, showing any defining characteristics (such as translucency) that will make the restorations blend in as they match the texture and contour of the unprepped teeth. In this case, we measured the base shade of the untreated maxillary cuspids, and instructed the laboratory to go a half-shade lighter for the final restorations.
null
Preparation
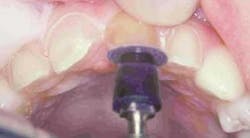
Anesthesia was administered locally. The endodontic access was opened palatally on No. 9 to make post space for reinforcement of the tooth. Since it is preferable to conserve as much sound coronal tooth structure as possible, this tooth would be treated with a bonded composite post, the access restored with composite, and the tooth prepared for a conservative partial crown. A twist drill rotary instrument was used to remove gutta percha to make post length equal to the height of the anatomic crown, leaving 4 mm of gutta percha at the apex to protect the apical seal. After the filling material was removed, the canal was reshaped in order to remove undercuts and prepare the canal for cementation of a prefabricated size 1 DenMat CorePost white fiber post. The size of the post should be no more than one-third the diameter of the root, leaving slight space for the adhesive resin cement and leaving the canal walls at least 1 mm thick. The canal was etched, thoroughly rinsed, and blotted dry with large paper points. The post also was etched, rinsed, and treated with a silane coupling agent. Unibond A & B (DenMat) was applied to the canal and the post, followed by air drying to prevent pooling. The post and canal were light-cured using the Sapphire Xenon Power Arc curing light (DenMat). Gerestore was syringed into the canal carefully to avoid creating air bubbles. The post was then seated with gentle but firm pressure, and the excess cement was removed using a microbrush dipped in bonding resin. The Sapphire curing light tip was placed directly on the post to cure. Single Bond and Supreme (3M/ESPE) were used to fill the access cavity, then cured.
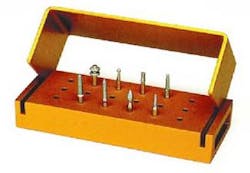
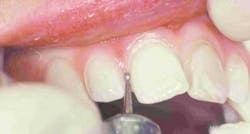
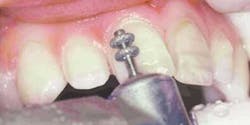
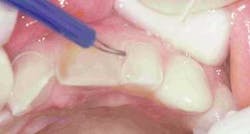
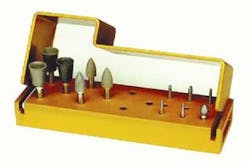
Preparation of the four incisors was then initiated using diamond burs from the Shofu Contemporary Cutting Kit (Figure 5). With the high-speed ElectroTorque KaVo handpiece, a small round diamond (0872-1) was used to outline the peripheral margins of the preparations (Figure 6). By scoring the facial surface of the incisors with the depth cutter (0897-1) (Figure 7), smooth and uniform tooth structure removal using a coarse tapered diamond (0835C-1) was facilitated (Figure 8). As tooth nos. 9 and 10 were prepared, it came time to address the gingival contour issues of the inflamed interproximal gingiva.
null
null

null
null
null
null
null
null
Gingival recontouring
The creation of a dazzling, esthetic smile in the anterior smile zone is greatly influenced by critical subtleties in gingival margin height, symmetry, and embrasure shape. This soft-tissue restoration interface must be free of inflammation, with appropriate contours of the gingiva and placed restorations to maintain periodontal health. The gingival contour even affects the illusion of optimal tooth alignment and symmetry of tooth length. The Bident Bipolar Electrosurgery Unit provides both cutting and coagulation of tissue and has proven to be an effective tool in gingival recontouring.
In preparation for the gumlift, a periodontal probe was used to verify that sufficient gingiva could be removed without violating the biological width (Figure 9). Anesthesia was supplemented with injections of 1:100,000 epinephrine injections into the affected area to provide hemostasis during contouring. The Bident straight wire tip (tip No. 3303) was used under constant water flow to excise inflamed tissue between No. 9 and No. 10 and to create esthetic, symmetrical gingival contours (Figure 10). With the Bident, tissue shrinkage is eliminated through less heat and current spread, greatly increasing post-operative comfort and patient healing. The resulting gumlift leaves healthy, symmetrical gingival sites that are ready for clean impression taking.
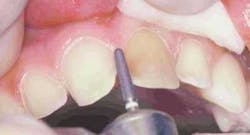
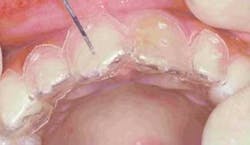
Once optimal gingival contours were achieved, preparation of the teeth continued. Incisal reduction was achieved using the coarse football diamond (Figure 11) to create a butt joint. The preparations were smoothed using the superfine tapered diamond (836V-1) (Figure 12). Adequate reduction was verified using the thin transparent Preparation Guide, made from the image-inspired wax-up. By checking all surfaces with the periodontal probe through the appropriate holes in the seated preparation splint (Figure 13), you can substantially enhance your success with porcelain restorations of adequate thickness and resistance. Finally, all sharp line angles were smoothed using the Shofu snap-on discs (Figure 14), further increasing resistance and strength. When the preparations were complete, an Impregum Soft polyether impression was taken (Figure 15).
null
Temporization
The next step, creating a "trial smile," is a crucial step in guaranteeing patient satisfaction with the entire outcome, and building confidence and faith in your restorative abilities as well as building referrals. With a "trial smile," the patient can leave in temporaries that meet their esthetic desires. The end of the preparation appointment then becomes a time for you to reward the patient for enduring a long appointment of shots and drills, and even a substantial financial commitment, with a smile that already looks better than the one he or she walked in with. It is also a way to ensure happiness with the final case, as you verify the choice of smile design in his or her mouth before proceeding. Remember: beautiful temporaries build confidence, patient satisfaction, and referrals!
The hard/soft matrix created from the image-inspired wax-up of the cosmetic simulation can help make the temporization step esthetic and easy, creating provisionals that look just like the imaged picture in just a few minutes. By using the digital imaging and this temporary technique and materials, you can achieve better results and increased patient satisfaction. Direct patient feedback, combined with your expertise and knowledge of the latest in technique and materials, provides superior esthetics, phonetics, and function, further paving your pathway to success.
The hard/soft matrix was seated over the prepared teeth to verify fit. Hemaseal & Cide (Advantage Dental Products) desensitizing agent was then used to coat the prepared teeth. After filling the matrix with Pro Temp Garant III autocure bis-acryl temporary crown and bridge material in shade B1, the matrix was seated over the teeth with firm pressure until the resin completely set (Figure 16). The outer hard matrix was first removed, then the inner soft matrix was peeled off to reveal a smooth, polished resin surface with minimal excess resin. The double layer of soft and hard construction allows for superb adaptation of the matrix. This results in temporaries with correct tooth contours, fine margins, and nearly ideal occlusion that require very little trimming and polishing (Figure 17). The minor adjustments can be made with fine polishing diamonds and discs.
The most important step of the temporization process is follow-up. This is the time to evaluate the contours, incisal edge position, color, and verify the patients' choice of smile design in their mouths using their temporaries. Therefore, for every cosmetic case, I see the patient for a follow-up appointment and complimentary cleaning and discuss any comments on shape and length. If any adjustments are needed, they are made with polishing discs. It is far better to catch and make any changes at this point than to have to redo a case. A quick alginate impression poured up in stone can be forwarded to the laboratory for any changes in the final porcelain restorations. Having verified shape and length, occlusion, and phonetics with your temporaries, the next step is to deliver the dazzling smile she desires!
null

null
Laboratory phase
All preoperative models were mounted using a facebow transfer on a KaVo articulator. The custom incisal guide table was fabricated, and models were mounted using centric bite records. A proper mounting is essential to verifying sound occlusion and function, and to providing optimal esthetic considerations.
The final restorations of the four maxillary anteriors were fabricated according to the patient-approved "trial smile." Feldspathic porcelain was stacked, A1 + Bright Value Dentin shade at the gingival half blending to a B1 + Bright Value Dentin at the incisal half. Proper selection of dental porcelains allows fabrication of esthetic restorations that have superior translucency, exhibit realistic light transmission, and maintain biocompatibility. After the veneers were baked and the function, contour, and surface texture were refined, they were glazed, etched, and internally silanated.
null
Bonding porcelain
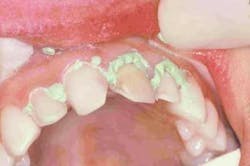
At the seating appointment, the temporaries were sectioned and removed using a composite removal hand instrument. Expasyl (Kerr) was expressed into the gingival margin to control bleeding and protect the gingiva from trauma (Figure 18), while all traces of residual resin were removed using gentle air abrasion (Rondo Flex, KaVo). Prior to etching, matrix bands were placed distal to No. 7 and No. 10 to allow for easy clean-up (Figure 19).
null
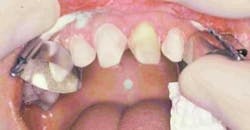
Because the final shade of the restorations can be further altered with the luting cement, RelyX Veneer try-in pastes (3M/ESPE) were tried in the veneers. After taking into consideration that the patient was a young, vibrant girl with medium complexion who could afford to have fairly white teeth, and since the upper front teeth could be slightly lighter than the posterior and lower teeth and still look natural, RelyX B-1 was chosen for the slightly darker No. 8, and A-1 for Nos. 7, 9, and 10. The preparations were etched with 34 percent phosphoric acid and thoroughly rinsed and dried. Hemaseal & Cide (Advantage Dental Products) was applied as a desensitizing and wetting agent to increase bond strength. Single Bond (3M/ESPE) was applied generously to the abutments. The excess was blown off, leaving a uniform glossy appearance. This was cured with the Sapphire light (DenMat). Rely-X Veneer Cement (3M/ESPE) was syringed onto the teeth and the veneers were filled with the resin cement. The restorations were then seated on the abutments with gentle pressure, seating the centrals before the laterals to prevent misalignment. The interproximal contacts were flossed and excess resin removed with a sable brush to allow for less mess and easier clean-up.
null
The restorations were then cured using a Sapphire Xenon Power Arc curing light (DenMat). When polymerization was complete, the gingival marginal flash was flicked off with a Bard Parker No. 12. A Shofu Contemporary Polishing Kit, which included six shapes of fine and superfine T and F diamonds and six ceramiste cups and points ranging from pre- to ultra-polish, was used to smooth and finish the porcelain margins (Figure 20). The cerisaw C-Spacer was used to free the interproximal contacts of excess cement. The contacts were then smoothed and verified with floss.
null
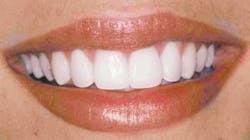
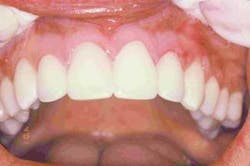
Delivering superior cosmetic and restorative dentistry requires more than just knowledge of sound biological principles, mechanical properties, proper techniques, and restorative materials. One must have a critical eye and judgment for assessing detail, and master the communication skills to consider the patient's needs in conjunction with applying your expertise during treatment planning and execution. It is essential to take advantage of the technological advances available every step of the way, from digital technology to shade-matching devices to dental adhesives to new porcelains. By aiming to go beyond the task of just merely improving misaligned, discolored teeth, we were able to create a truly stunning, spectacular smile (Figures 21, 22).
Dr. Lorin Berland has built an international reputation for his expertise in cosmetic dentistry. He has developed an exclusive cosmetic and family dentistry practice in Dallas, Texas. Dr. Berland dedicates his practice to informing and educating his patients and colleagues about cosmetic dentistry, regularly sharing his skills and techniques in seminars and lectures with dentists who travel to see him from around the globe. Dr. Berland, a board-certified cosmetic dentist, is also a Fellow of the American Academy of Cosmetic Dentistry. For more information, log on to www.dallasdentalspa.com or call (214) 999-0110.