Th 134613

Restore that posterior tooth ... directly

March 1, 2003
Articles detailing the benefits of posterior composites and the most effective placement techniques to ensure clinical and esthetic success are plentiful throughout dental literature.

By Christopher Ramsey, DMD

Articles detailing the benefits of posterior composites and the most effective placement techniques to ensure clinical and esthetic success are plentiful throughout dental literature. Unfortunately, in almost all cases, such articles reiterate a practical observation that is quickly becoming invalid — treatment with direct posterior composites is time-consuming and overly technique-sensitive.

As a result, there are many (but certainly not all) dental professionals — even those who practice "esthetic dentistry" — who are unwilling to provide the ultimate in direct posterior restorations. To justify their reluctance to placing such restorations, some practitioners will counsel patients that composite fillings don't work, or that only opera singers need to have white fillings. Possibly worse yet, there are some dentists who provide posterior composite fillings that press one piece of B1 material into the preparation with their thumbs, grind in the occlusion, and then send the patients on their way.

Such aversion to, and hurried placement of, direct posterior composites is unnecessary. Today's dental products and technology can help make anything possible, including long-lasting, easily placed, and natural-looking posterior fillings. 1-4 In fact, today's materials and instrumentation offer dentists the most simple, cost-effective, and immediate manner in which patients are provided with clinically sound, functional, durable, and esthetic treatments in the posterior of the mouth.

Clearly, however, there are dental professionals doubtful of the truth behind this assertion and in need of a timed session to determine if placing direct posterior composite restorations is worth the time and effort. Therefore, this article presents a step-by-step, minute-by-minute account that reveals how long it actually takes to provide a high-quality posterior occlusal composite restoration.

A case in point

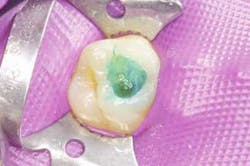
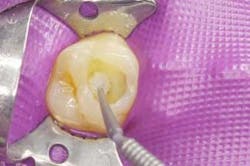
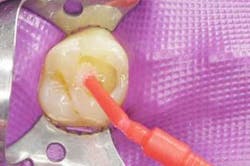
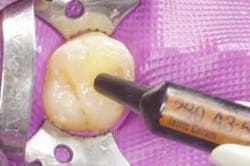
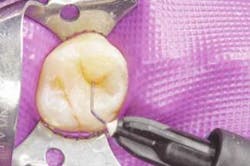
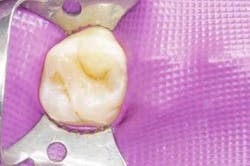
A 24-year-old female patient presented with caries on tooth #3. The decay present in the mesial half of the tooth was of adequate size for restoration with a direct posterior composite.

  • Topical analgesic was placed over tooth #3 for three minutes, and one carpule of 4% Citnest was placed into the vestibule to anesthetize tooth #3. Time for this step: Eight minutes. Total time so far: Eight minutes.
  • A clamp and rubber dam were placed. Note: This step is not optional. It is necessary to ensure proper placement of the composite material.5-7 Time for this step: rounded up to one minute. Total time so far: Nine minutes.
  • The diseased part of the tooth and caries were removed, and a caries indicator placed (Figure 1). A small amount of caries was still present in the center of the preparation and subsequently removed. Time for this step: Two minutes. Total time so far: 11 minutes.
  • At this time, the assistant mixed a glass ionomer (Lining LC Paste Pak by GC Fuji), which was then placed as a liner in the deep preparation areas. Note: Placing the glass ionomer provides a better insulating effect and can reduce sensitivity. The glass ionomer was cured using a high-powered quartz-halogen polymerization light (Astralis 10 by Ivoclar Vivadent) on high power for 30 seconds (Figure 2). The high intensity allowed for fast curing of the composite material. Time for this step: Two minutes. Total time so far: 13 minutes.
  • Tooth #3 was then etched with 37% phosphoric acid for 15 seconds, rinsed for 20 seconds, and the preparation air-thinned (Figure 3). Time for this step: 35 seconds, but round up to one minute. Total time so far: 14 minutes.
  • Next, a desensitizing agent containing 5% gluteraldehyde and 35% polyethylene glycol dimethacrylate in an aqueous solution (Systemp Desensitizer by Ivoclar Vivadent) was placed and burnished into the preparation for 30 to 45 seconds) to form a firm protein plug to seal dentin tubules and reduce hypersensitivity. Note: This is a step the author does not skip. Then, a dry micro brush was used to absorb any pooled liquid (Figure 4). Time for this step: Two minutes. Total time so far: 16 minutes.
  • Once the preparation was clear of any pooled liquid, a single component bonding agent (Excite by Ivoclar Vivadent) was placed (Figure 5), and an air drier (A-dec) was placed over the preparation for approximately 10 seconds to evaporate the carrier. Note: The carrier was removed to increase bond strengths of the adhesive. The preparation was then light-cured for 20 seconds. Time for this step: Two minutes. Total time so far: 18 minutes.
  • This step represents the beginning of composite placement. A regular body microhybrid that delivers excellent durability, sculptability, and handling (Tetric Ceram by Ivoclar Vivadent) was selected, and shade A3.5 was placed (Figure 6). This shade worked well due to its ability to provide a dentin shade that would show through the enamel layer and give the restoration a lifelike halo effect. At this point, a thin instrument of choice was used to carve the anatomy (Figure 7, next page). Once the anatomy was placed, the composite was light-cured for 40 seconds. Time for this step: Three minutes. Total time so far: 21 minutes.
  • For the enamel layer, a bleach shade 030 was selected. The key to placing the enamel layer was to place the composite onto the dentin shade and feather it into the already carved anatomy. This technique allowed for the composite to be spread thinner as it reached the center of the restoration. It further promoted the halo effect, since the A3.5 shade shined through the thin 030 shade of composite (Figure 8). Time for this step: Three minutes. Total time so far: 24 minutes.
  • To further enhance the restoration, a very small amount of dark brown color (Tetric Color by Ivoclar Vivadent) was placed and light-cured for 20 seconds (Figure 9). Time for this step: One minute. Total time so far: 25 minutes. At this time, the restoration was complete (Figure 10).
  • The rubber dam was removed, and occlusion verified. Alterations were made, and the restoration was polished (Astropol by Ivoclar Vivadent) (Figure 11). Time for this
    Figure 1
    Click here to enlarge image

    null

    Figure 2
    Click here to enlarge image

    null

    Figure 3
    Click here to enlarge image

    null

    Figure 4
    Click here to enlarge image

    null

    Figure 5
    Click here to enlarge image

    null

    Figure 6
    Click here to enlarge image

    null

    Figure 7
    Click here to enlarge image

    null

    Figure 8
    Click here to enlarge image

    null

    Figure 9
    Click here to enlarge image

    null

    Figure 10
    Click here to enlarge image

    null

    Figure 11
    Click here to enlarge image

    null

    Conclusion

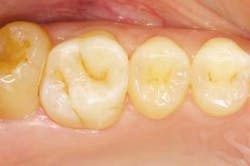
    The posterior occlusal composite restoration presented was completed on tooth #3 in 27 minutes. At a time when today's restorative materials fulfill basic treatment requirements and simultaneously achieve a natural-looking blend with a patient's natural teeth, 27 minutes is not too much time to spend in order to provide a superior restoration. As a result of enhancements to material handling, esthetics, and wear properties, today's direct posterior dental composites can be used quickly and easily to satisfy treatment demands. And, with the variety of highly acclaimed hands-on training seminars offered throughout the country, clinicians can now use their thumbs as fingers, not as condensers.

    Note: References available upon request.

    Dr. Christopher Ramsey practices esthetic restorative dentistry at the Studio of Esthetic Dentistry in Palm Beach Gardens, Fla. Dr. Ramsey is currently an instructor at the Institute for Oral Art and Design in Bradenton, Fla. He can be reached at (561) 626-6667.