Restoring wide embrasures
- Composi-Tight image showing five bands, two rings, and MOD set-up.
- Flexi Wedge image.
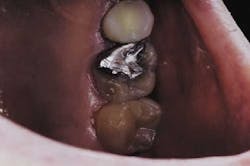
- Amalgam to be replaced.
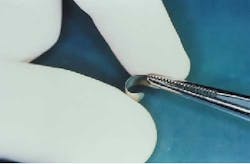
- Matrix band being curled with fingers to facilitate placement.
- Band being slid into place.
- Curl wedge to prevent damage to the papilla as it moves through the inter-proximal space.
- Pre-curled wedge.
- Flexi Wedge provides a tight seal.
- Where tooth structure is missing, ring tine is placed on distal of wedge. Where tooth structure is present, ring tine is placed inside of wedge.
- Anatomy is roughed in.
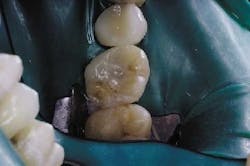
- Completed restoration after occlusal adjustment, finishing, and polishing.
The Composi-Tight Sectional Matrix System® produces tight, natural contacts on posterior composite restorations.(Fig. 1)
The resulting seal, combined with proper retainer-ring placement and burnishing of the thin, contoured band creates a tight, anatomical contact, even on wide embrasures.
A direct composite restoration on No. 30 can be seen in Fig. 3.
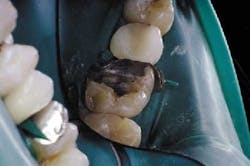
Place the rubber dam and prepare the tooth. An open contact is necessary to place the matrix band.
Select a matrix band size so that the occlusal edge will approximate the height of the adjacent margin. The matrix band is pre-curled to approximate tooth curvature (Fig. 4).
On wide embrasures, be sure to pull the matrix far enough through the inter-proximal space to reach around the missing cusp. However, there must be enough matrix material left for the G-Ring to grasp on the side where tooth structure is present in order to prevent spring-back of the band when burnishing. If the preparation extends well beyond the line angle and the band does not reach far enough to completely confine the prep, some flash may occur. The band was pulled into place from the buccal using GDS Band Placement Forceps. (Fig. 5)
Due to the wedge's flexibility and the G-Ring's tooth-separating force, select a wedge large enough to allow compression of the plastic to ensure a tight seal. Curl the tip of the wedge upward to prevent damage to the papilla as it moves through the inter-proximal. (Fig. 6 & 7)
Insert the wedge from the side where tooth structure is missing. (Fig. 8)
Proper wedge orientation is important for wide embrasures because the G-Ring tine uses the wedge for support as explained in the following section. Place the wedge firmly for optimal sealing and separation. Used in conjunction with the G-Ring, the wedge's flexibility will enable a firm seal of the band around the area of the missing cusp (beyond the line angle).
Using a GDS Ring Placement Forceps, place the G-Ring tine on the opposite or backside of the wedge on the side with the missing cusp. This tine placement prevents the band from collapsing into the preparation due to the force exerted by the G-Ring tine (Fig. 9).
On the side where tooth structure is present, the G-Ring is placed between the band and the wedge. This prevents spring-back of the band when burnishing and reduces the amount of finishing work on this side of the tooth (Fig. 9).
Burnish the band to the adjacent proximal surface. On the side with the extension, flash is accessible for rapid finishing.
Etch, rinse, bond and fill the tooth. Rough in the anatomy (Fig. 10), and remove the dam. After adjusting occlusion, touch up, polish, and seal the restoration. (Fig. 11)
Composite contacts on direct posterior wide embrasures present a unique challenge. Using the contoured sectional matrix band, wedging and ring-placement method outlined above ensures that an excellent contact will be achieved and that the tooth's natural strength and function will be restored.
Applications:
Direct posterior Class II, MOD, wide embrasure, back-to-back MO/DO, pedodontic and sub-gingival restorations.
For more information, contact
Garrison Dental Solutions
110 DeWitt Lane
Spring Lake, Michigan 49456
(888) 437-0032 (USA & Canada)
(616) 842-2244 Fax: (616) 842-2430
Email: [email protected]
Secure Online Ordering:
www.garrisondental.com
Instructional video available.
GDS offers a money-back guarantee on their products.


