The 15-minute crown procedure

One of the first questions a patient asks when they are told they need a crown procedure is, "How much time will this take?" The other question is, of course, "How much will it cost?" These are obviously the two biggest concerns patients have or they wouldn't ask these questions so frequently. What if you were able to shave off 75 percent of the time it normally takes you to perform a single-unit crown procedure? What would that mean to you? What would that mean to your patient?
My assistant and I have been able to perform a single-unit crown procedure in less than 15 minutes. We use a digital timer to keep accurate time. The timer is started when the patient is seated straight up in the chair, before anesthesia is administered. The timer is stopped only after the chair is returned to the upright position and the patient is ready to walk out of the operatory. What we're talking about here is the total treatment time from anesthesia to crown prep, to temporization, to shade, to post-op instructions.
Benefits of a 15-minute crown procedure
If you can perform a crown procedure faster, then you have improved your life in many ways. One way is in the accumulation of personal wealth, because time is money. By saving time, you easily can translate time savings into increased profitability. Another benefit is decreased stress, because time spent in the chair equals stress, so the less time the procedure takes, the less the stress for both you and the patient. Finally, the less time the patient spends in the chair, the more kindness and compassion you are showing the patient.
Have you ever had a crown procedure performed on yourself? I have. It's not particularly fun. If you asked me if I would rather sit for an hour or sit for 15 minutes to have this done, I'd take the 15 minutes anytime. That is, I would opt for a 15-minute procedure as long as the dentist could do a good job. This technique does not compromise quality in any way.
Imagine for a minute what it would mean to a patient to walk in to your office, be seated in a dental chair, and stand up and walk back out in less than 20 minutes! The patient's perception of the entire experience has got to be better than a visit that in some offices takes up to four times as long! The procedure is much less tiring to patients when they don't have to sit in the chair for a solid hour.
From your perspective, imagine making almost twice as much production in one month compared to what you normally produce. Imagine not running around all day to make your production goal! I got to experience that feeling one month when our office produced $128,000. Our average for the same period the year before that was approximately $74,000 per month. Even better, I produced that month's production in a relaxed way.
Putting quadrant dentistry in perspective
Quadrant dentistry was predicated on the idea that a significant number of patients would have quadrants of old amalgams to replace (decades before that, it was quadrants of decay). Rather than do dentistry one tooth at a time, you would perform quadrants of crowns and inlays and this would result in high production. In today's world, with fluoridation of public water supplies, good oral hygiene, and preventive dental visits, the opportunity to do quadrant dentistry is becoming more scarce. I am not knocking quadrant dentistry; on the contrary, I am one of its greatest proponents. I am only saying that you can't perform quadrant dentistry where the opportunity for it doesn't exist. If we want to have high production, we need to have substitutes for quadrant dentistry. Maybe you're like me and you don't see a patient who needs a quadrant of dentistry every day, but you do see three people who need single-unit crown procedures. Using the 15-minute crown procedure technique, you easily can be as productive as someone performing quadrant dentistry can.
Here's how it's done. It's helpful if the staff is good about getting the patient seated in a timely fashion. It's also very nice if the doctor is vigilantly anticipating his schedule and arriving in the operatory punctually (something most of us struggle with). Make sure that you have checked all of your other hygiene patients first. For instance, if you anticipate that you will be interrupted for an exam during your procedure, perform the exam first.
If you get up to go to another operatory during the 15-minute crown procedure, you will never finish in 15 minutes. You have just lost a lot of time. You had to change gloves and your assistant sometimes gets up and leaves. Now, you'll have to go hunt her down. By not leaving the operatory, you control how fast the procedure can be done. Not only have you saved your time and the assistant's time, but you've saved chair time. That chair is available for another patient very quickly. In fact, for this procedure, you don't need a highly trained assistant; a minimum wage worker will do because only minimal training is required for the single-unit crown procedure.
Anesthesia
The first step is anesthesia. It won't matter how fast you can do a crown prep if you can't get your patient numb in an efficient, predictable way. This is one of the most underrated procedures in dentistry, and one of the most important factors in running on time. Now I am going to tell you a few things about anesthesia that are the secret to speeding up every procedure you perform and relieve much stress. There are three things to remember:
- Don't use topical (do keep some around for a patient who requests it)
- Give palatals every time
- Use the X-Tip - the X-Tip absolutely revolution-ized my practice
Forget topical!
To many, this will seem completely iconoclastic, but topical is absolutely one of the most useless products dentists have ever wasted their time with. Omer Reed said, "Don't use topical, it just warns them you're about to stick them." I didn't believe Omer for about 15 years. Then, a friend of mine called and told me he was watching Omer perform an onlay prep and he gave a shot to a lady without topical. She never flinched, he said. After hearing this testimonial, I held my breath and gave it a try. Lo and behold, he was right. I haven't used topical since (except for the occasional patient who requests it).
Palatal anesthesia
Here's what I do. I take the back end of a mouth mirror. I say to the patient, "I'm going to put a lot of pressure up here on the roof of your mouth. Then, I press the back end of the mouth mirror in the area of the palatal foramen for about three seconds. Then I say, "You are going to feel a brief pinch." Then I poke my needle in right next to the mirror and immediately pull the mirror back. The most common reaction is that the patient blinks. That's all - just a blink! Then I very slowly - ever so slowly - put slight pressure on the syringe plunger. The Wand, from what I hear, is great. Until I get one, I use the concept of very slow injection. (It's one of the few things I do slowly.) Now you don't have to worry about whether patients will feel pain. After a palatal, they rarely do. Palatals work quickly. You also don't have to wait long before you can start treatment.
Mandibular blocks
Now, how about mandibular blocks? My nemesis is the mandibular block! I feel that I must be the world's worst when it comes to the mandibular block. My failure rate was so high, that I went back to the textbook to review the mandibular block. I went to seminars on how to give a mandibular block. I learned the Gow-Gates technique and the Akinosi technique. I still had a high failure rate of mandibular blocks.
I hate mandibular blocks because of the long wait before they take effect. When they fail, you have to perform them all over and then wait again. For me, waiting for a mandibular block to take effect was one of the biggest time-wasters in my practice. The stress from running back and forth between operatories because of time delays from mandibular blocks was killing me - not to mention patients who squirmed around because I didn't get them numb! I have had a couple of my friends tell me that they almost never miss a mandibular block. I have no reason to doubt their word. I am very envious. I have always prided myself on superior quality in many areas of dentistry, but in the area of the mandibular block, I am completely frustrated and humiliated by the lack of consistency I can achieve with this procedure.
Enter the X-Tip
Luckily, I found an effective substitute for the mandibular block - at least in the case of the single-unit crown prep. Even though the technique had been around for many years, I completely ignored it because it just sounded too harsh. I just couldn't imagine poking a hole through someone's jawbone just to get anesthesia. Out of frustration with mandibular blocks, I finally decided to give intra-osseous anesthesia a try. It has truly revolutionized the way I practice dentistry! My patients now are numb in two minutes. Predictably! I started with Stabident, but quickly switched to X-Tip. It's very user-friendly. I can't imagine practicing without it, and my staff can't imagine how they could live without me having it. Now I can run on time because I can get my patients numb fast.
Overlap where possible
If you're working on the upper arch, your assistant should start extruding the bite material about 10 seconds before you are finished injecting. Don't expect her to know when to start because the speed with which you can inject will vary from patient to patient. Just tell her to be ready so that when you say, "Go," she starts.
This is a very important concept. You can use this concept in many aspects of your practice, especially scheduling. It's very critical when you're performing procedures with set times to overlap procedures instead of performing them sequentially. Just remember - you gain time by overlapping; you waste time with sequential treatment!
Discus Dental's bite material sets so fast that I don't even bother using a timer. I just feel it and, when it feels firm, I pull it. It takes about 30 seconds. It's probably the only material that I don't time.
The 60-second crown prep

Omer Reed is the guy who first talked about the 60-second crown prep. When Fred Simmons, a highly regarded clinician from Houston, heard Dr. Reed talk about the 60-second crown prep, he commented, "Heck, sometimes it takes me that long just to pick out a bur."
If you can't conceive how a crown prep can be done in 60 seconds, it's probably because you have never used a high-speed handpiece that has high torque, or because you're not using a brand new bur every time, or maybe you're just using the wrong bur. Here's a review of Omer Reed's 60-second, crown-prep technique. You fire up your high-speed handpiece and poke your carbide bur into the enamel about 2 to 3 mm gingival to the occlusal aspect toward a proximal-point angle, and spear into the DEJ. Then, moving your bur in a direction opposite to the rotation of your bur, you peel the enamel right off the top of the tooth. Then, you pierce the DEJ from the occlusal aspect and, going counter-clockwise, peel the enamel off of the sides of the tooth.
Diamonds don't work well with this technique. With diamonds, you are just wasting your time grinding through a lot of enamel that is eventually going to be gone anyway. You wouldn't grind a piece of wood to a particular dimension; instead, you simply would cut through it. The 60-second, crown-prep technique uses this same concept. Use the Great White Shark bur from SS White. You won't be disappointed by its performance.
I use a Kavo opti-torque handpiece that has about 20 percent higher torque than the old style Kavo super torque. The only thing faster than the Kavo opti-torque is the electric handpiece. Kavo and Bien-Air make one and they are the ultimate in torque and control. The other nice feature of the Kavo opti-torque is that it has four cooling ports. If there is an obstruction of coolant from three of the ports, you always will have at least one port cooling the bur.
If you notice your handpiece bogging down on you as you work, just chuck the used bur in the trash and grab a brand new sharp one. Keep extras in your bur block. They cost about a buck apiece. It doesn't matter if you trash them. Time is what matters. (It should go without saying that you're using a push-button chuck turbine.)
I don't necessarily achieve the complete crown prep in 60 seconds. As a matter of fact, I allow two minutes for the preparation phase, which is most often more than adequate. If you spend more time than this on a tooth that presents itself as a straightforward crown preparation, you're probably just piddling around. It will depend on the tooth. Some procedures will require more time because of various complicating factors. This does not diminish the validity of the concept of a theoretical 60-second crown preparation. You don't need to spend forever with the preparation phase to wind up with an excellent result.
When I'm finished with the carbide, I switch to a fat chamfered diamond. This refines the prep. The wide diameter provides a lot of control, decreases the chance of gouging the tooth, and it works rapidly.
Feedback from colleagues shows a concern of "frying" the pulp of teeth prepared this way. I checked how many root canals I averaged per month last year compared to crowns. I performed many more crowns and veneers than I did root canals, and the main reason I performed root canals was because of cariously exposed pulps.
The buildup
Once the decay and/or defective restoration are out and the cavity prep is clean, I isolate and put in a buildup. I've been using GC's Fuji II LC that you mix in the amalgamator. After using auto-mix materials, I can't understand why anyone would use a hand-mixed material. There's almost no clean-up required with any of the materials I use. The Fuji II LC is a dual-cure material, so after I inject it into the cavity preparation, the assistant hits it with a curing light for about 10 seconds and we're back to prepping. I try to stay supragingival, but if I can't, then I usually will stop prepping and pack cord before I finish the prep. By doing this don't cause any more bleeding than absolutely necessary. Let the bur hit packing cord instead of gingiva. It's always better to prevent bleeding than control it after the fact.
The impression will be taken with the cord in place 90 percent of the time. That's because at least half the time you pull a cord, the tissue starts bleeding again, or it flaps over the margin, or your impression might tear because it travels too far subgingivally. There are just too many possible complications that can occur that might result in remakes that are anathema to a time-efficient dentist.
If you can keep the crown supragingival, that's the best way. It saves you so much time and the gum is always much happier around natural tooth than metal or porcelain.
Packing cord
Even though the best way is not to pack retraction cord at all, it frequently is not possible to proceed without doing it. Many times, a deep proximal box puts the prep under the gum line, or a broken-down tooth, or just high gum tissue will necessitate packing cord. We precut and prepackage Ultradent's cord in miniature zip-lock bags that are about an inch and a half square. We keep Hemodent in a syringe and inject it into the bag to wet the cord. I pack one side and my assistant packs the other.
As a kid, I was a Boy Scout, and the Scout motto is, "Be Prepared." This is very apropos for dentistry. If your assistant does not have you completely set up beforehand, you can forget proceeding in a timely manner. This is so important! It's the difference between working in treatment - or simply scheduling in more treatment - and the opposite, running behind. Suffice it to say that we set everything up in advance, and everything we are going to use is within easy reach.
The impression
Once the prep is completed and, if needed, the cord is packed, we begin the impression. I reach for the gun with a low-viscosity, vinyl-poly siloxane, and my assistant reaches for the high-viscosity tray material. She begins extruding a little bit before I do because it's going to take her longer to load her triple tray. As soon as I am finished, the tray goes right in and we hit the three-minute timer. The tray is a disposable, rigid aluminum tray from Clinician's Choice or a stainless steel, reusable one from Temrex. Early in my career, I was having trouble with coping fits. When I went to the Temrex tray, my coping-fit problems vanished. I would never use a plastic disposable tray for a final impression for crown prep!
While the impression material sets, we double-check to see that all of our other materials are ready and the assistant completes the chart. I take a shade using the teeth that are exposed on the opposite side of the arch. It's very important to use this precious time to complete activities such as shade-taking and post-operative instructions. If you wait until the end of the appointment, you have wasted time. By the way, we always give patients a written copy of postoperative procedures because it ensures that they have been completely informed.
Ten seconds before the timer beeps, I start extruding the Integrity or Luxatemp into the triple-tray bite registration in the tooth that we will be making a temporary crown for. The assistant removes the tray, and I go right back in with the bite registration.
My assistant pushes the two-minute timer. We inspect the impression to see if it's good. If not, we will re-impress. Most of the time, it's perfect. When the two-minute timer goes off, I pull the tray, remove the acrylic temp with a hemostat, and reach for the low-speed lab handpiece so that I can trim the flash. If you tell the patient to bite firmly when you put the material in, you will almost never have to adjust the occlusion.
Then I reach for a large-diameter, abrasive-impregnated rubber polishing point and put a shine on the acrylic temp. Forget using rag wheels; they are pass
My assistant hands me a cotton-tip applicator with Vaseline on it and I swab the outside of the crown with the Vaseline. It's almost impossible to clean temporary cement off of acrylic once it's set. A thin coat of Vaseline solves this problem quite well. Only swab the interproximal areas or you will never be able to hold onto the temp.

While I have been refining the temporary, my assistant has been removing any acrylic flash from the adjacent teeth and pulling cord and rinsing, drying and isolating the tooth. Once she fills my temp with cement, I seat it and have the patient squeeze on a cotton-tip applicator. My assistant or I can clean most of the cement from the buccal aspect using a posterior scaler without dislodging the temporary crown. Then the patient lifts off the temporary and you clean the lingual aspect.
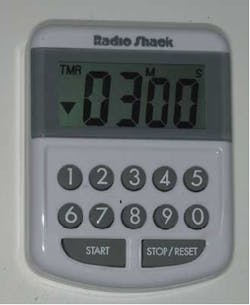
Timers
Why do I use timers? You can't achieve these efficiencies and keep quality intact without timers! If you use a pre-set timer, then you can simply push a button and your mind is free to do other things until the alarm goes off. When it does go off, all you have to do is push the stop button and the timer automatically resets itself.
You don't want to pull an impression too early, even if it feels like it's set. If you do pull it too early, it will distort. That will not only mess up your quality, but it also will cost you more time down the road with a remake or with trying to make something fit that never was accurate in the first place. Who has time for that? If you leave the material in longer than it needs to be in, then you have wasted more time. Napoleon once said, "Ask me for supplies and ask me for more men, but don't ask me for time."
I waited for years for someone to offer a single-event timer. Finally, Radio Shack started selling them. They sell for about $15. Buy three or four for each of your doctor operatories and use double-sided sticky tape to secure them to your cabinet. By doing this, you can easily reach them from your chair. Then, label them with a Sharpee or a label from a label machine.
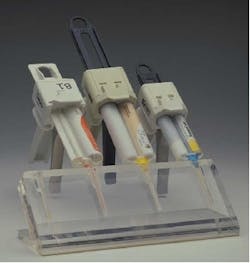
Containing your guns!
I love using materials that extrude from guns because they help me achieve such incredible speeds in completing crown procedures. The problem is, where do you put all of these guns? In the 15-minute crown prep, we are using five of them!
There's really no good place to put these guns. They are big and bulky and take up a lot of space. We used to keep them in drawers, but this required an assistant to have to reach for the guns. This is very awkward to do! The Gun Rack is an essential item in the 15- minute crown prep. It's a new product and impression guns slide right into it. When you need an impression gun, you just draw! If Doc Holliday were alive today, there's no question he would love this product. There's no way I would attempt to use five impression guns without a convenient organizer like The Gun Rack.