One of my favorite things right now: Custom composite shade tabs

- Many conventional shade guides are ceramic. Ceramic and composite have very different optical properties, so don’t rely on a ceramic shade tab to match your composite.
- There is a lot of variation in shade for composites. Don’t believe me? Take a few different brands of A2, dispense them on a glass slab, cure, and see for yourself!
- It is important to know the classification of the composite you are using. Different classifications of composite have different filler content and different physical and optical properties. For example, a heavily filled hybrid composite offers more opacity and strength than a nanofilled composite that is intended for an enamel replacement.
- It is extremely common for composite to appear different after it is completely cured.
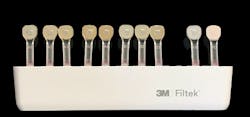
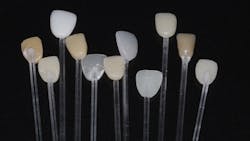
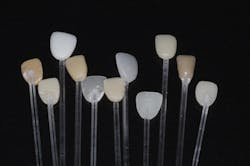
If you don’t have a kit to fabricate them, this can be easily done by indexing an existing shade tab into putty. Once the putty is set, you can use that as a template for custom shade tabs, and they can be affixed to a handle (I use coffee stirrers!). I fabricate a custom shade tab for every composite (figure 3) I have and color code them so I can easily identify my dentin shades, enamel shades, and value shades.
Related articles
- One of my favorite things right now: Carbon Nitrile Gloves from Cranberry
- One of my favorite things right now: Airflow Prophylaxis Master
- One of my favorite things right now: Skyce from Ivoclar Vivadent
Editor’s note: This article first appeared in Through the Loupes newsletter, a publication of the Endeavor Business Media Dental Group. Read more articles at this link and subscribe here.
About the Author

Pamela Maragliano, DMD
Pamela Maragliano, DMD, is the chief editor of Dental Economics. Based in Salem, Massachusetts, Dr. Maragliano began her clinical career as a dental hygienist. She went on to attend Tufts University School of Dental Medicine, where she earned her doctorate in dental medicine. She then attended the University of California, Los Angeles, School of Dental Medicine, where she became board-certified in prosthodontics. Dr. Maragliano owns a private practice, Salem Dental Arts, and lectures on a variety of clinical topics. You may contact her at [email protected].