Digital photography in dentistry: Tools and techniques to help your patients and improve your practice

Digital photography can have numerous impacts on your dental practice: Photos can educate patients and improve case acceptance, communicate shade to the dental lab, and improve patients' confidence following treatment. In this article, Ben Ross, DMD, FACP, illustrates the different types of photos you should take for each of these purposes and explains what tools you'll need to take them.
By now, if you don’t have some kind of digital camera (whether a point-and-shoot, a digital single-lens reflex [DSLR], or even a smartphone), you may be living in an alternate universe. The days of film are just about gone, and the desire for instant photographic review is almost ubiquitous (see: selfies). This is also true in dentistry—from instant, on-screen x-ray review for the dentist to showing existing or prospective patients how their teeth look from our point of view in either the operatory or the consult room to help them better understand what great dentistry can do for them.
In my prosthodontic practice, I use a DSLR camera (Nikon D600), a macro lens (Micro Nikkor 105-mm), and either a ring flash (Nissin MF18) or a dual-point-source flash system (Nikon R1C1) with a bracket (PhotoMed) for almost every photo (figures 1–2). The flash I use depends on what I am trying to convey and who my audience is. I normally keep the camera on its manual setting and adjust the f-stop to vary the depth of field and focus. Wi-Fi–enabled Secure Digital (SD) cards can send the photos directly and instantly to a viewing device, such as a tablet or Wi-Fi–enabled computer monitor in your operatory, so you can show your patients what you see in real time (figure 3).

Figure 1: Nikon DSLR D600, Micro Nikkor 105-mm lens, Nikon R1C1 dual flash with PhotoMed bracket

Figure 2: The same camera body and lens with the Nissin MF18 ring flash
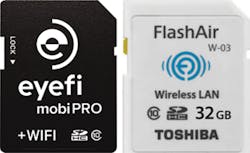
Figure 3: Wi-Fi–enabled SD cards that can instantly transmit a photo to a device for patient viewing (images courtesy of Eye-Fi and Toshiba)
I will not go into too much detail about dental and macro photography since many books have been published on the subject, but a resource I highly recommend is Photography in Dentistry: Theory and Techniques in Modern Documentationby Pasquale Loiacono and Luca Pascoletti.
I will, however, say that digital photography in the dental office can have a huge impact in many ways. While there are many uses for it, I will focus on what I have found to make the best use of my time and also to have the greatest impact for my practice and for my patients’ oral health.
Intraoral and occlusal photographs to educate the patient
If I have a doubtful patient who has a restoration that needs to be replaced or who has recurrent decay, a crisp, clear picture of the problem area can convince him or her of the need for treatment. For these photographs, I typically recommend a ring flash for ease of use, an f-stop from 14–26, and having an assistant available to hold the retractors (plastic or metal will work fine, depending on personal preference). A warm water bath or a heating pad for the mirrors will decrease fogging from the patient’s breath. Having your hand or your assistant’s hands in the picture detracts from the focus on the teeth. That’s why I highly recommend using either mirrors with handles (PhotoMed) or long, extended mirrors. They have become something I cannot do without for this reason (figure 4).
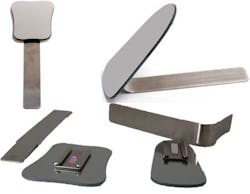
Figure 4: Mirrors with handles from PhotoMed
When taking the intraoral mirror shots from the lateral perspectives, I always try to get the patient to separate his or her teeth so the entire tooth and what I am pointing out can be easily seen (figures 5–6). The same is true for the retracted frontal shots; you can see much more when the teeth are apart than when they are together, in most instances (figures 7–8).

Figure 5: With a closed lateral view, Patient A may not see what we know is there.

Figure 6: For patient education, it is just as powerful to show the teeth apart as it is together in lateral views, especially in wear cases.

Figure 7: A closed frontal retracted view of Patient A

Figure 8: A slightly open frontal view of Patient A shows the destruction that otherwise may not be appreciable.
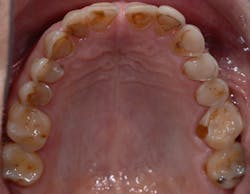
Figure 9: In an occlusal view of Patient A, the extreme wear and erosion is now very visible on almost every tooth—a powerful image for patients who can’t see this themselves.

Figure 10: Patient B presented for esthetic concerns about the two centrals. I always make a photo with the lips framing the smile; this comes into play after the dentistry has been performed (figure 12).

Figure 11: Patient B had a shade photograph taken with a dual-flash setup and at least two shade tabs. You should also take a shade of the underlying tooth structure if ceramic crowns are to be used.

Figure 12: Patient B after the central incisors were restored: Often, the patient’s lip line will rise higher following an esthetic improvement. Showing potential patients this type of photograph—with lips—makes a bigger impact than a retracted photo.
Shade communication with the dental lab
Unless you have a lab in your dental office, you are probably communicating with your lab using photos. I always advise dialogue between the dentist and the lab on how to effectively communicate shade; labs usually have a specific photo series they prefer the dental office to provide. If you are unsure, I recommend the following:
- Use a dual-point flash (figure 1) to decrease the amount of direct reflection. Place the flashes three to four inches to the left and and three to four inches to the right of the lens, and point them 30–45 degrees toward the focal points of the picture. Take a few photos this way, and you’ll notice the translucency achieved with this flash setup, which doesn’t happen as well with the ring flash.
- Always have more than one shade tab in the photo for reference and place the edge of the shade tab to the edge of the restored tooth, mirroring its image, depth of field, and angle with the lens (figure 11; figures 14–15). Some shade tabs look different, depending on how and where you hold them. Again, have this discussion with your lab ahead of time if possible.
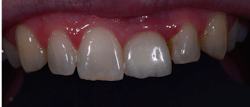
Figure 13: Patient C: Using a black background or contraster better illustrates translucency near the incisal edges.

Figure 14: Patient C: Using multiple shade tabs gives more information to the ceramist, so he or she can compare spectral differences that may not be apparent with one photo featuring only one shade tab.

Figure 15: Patient C: Having specific tabs from the line of ceramics your lab uses also comes in handy when communicating difficult shade matches.
‘Before’ and ‘after’ portraits
What speaks volumes to patients is how they see themselves after treatment. Did you make a difference in their smiles? How can you tell without photographs of what they looked like before you started? You (and your patients) simply can’t.
For portrait photography, I recommend that you have a regular DSLR camera with a standard 35- to 70-mm lens and two separate remote flashes with diffusers. (The R1C1 system can work for this, as well, or you can purchase additional flashes to use specifically for this.) I like to seat the patient in a stool or chair that swivels away from the wall because it creates too much direct reflection and shadows. Take these photos capturing the lower neck to just above the head in the following poses:

Figure 16: A gentle smile: the average smile patients present with

Figure 17: An animated smile with the eyes a bit squinted: Note how she raises her cheeks and upper lips to show more teeth. People can often tell a genuine smile from a posed one by looking at the eyes.

Figure 18: The right 45-degree-angled shot, smiling: I call this “the roundtable conversation view,” as it illustrates how others see us smile and talk from different angles.

Figure 19: Notice how the eyes demonstrate the difference in the genuine smile.

Figure 20: The left 45-degree-angled shot, smiling: Again, this helps us see what is visible during group conversations.

Figure 21: Open mouth repose: Have the patient say an “m” word, such as “Emma,” without moving the lower jaw after saying the word, as this helps to show incisal length at rest and any changes you may have made to it.
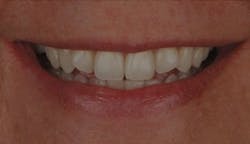
Figure 22: Compare this type of photo with the type shown in Figure 21 and evaluate the lip mobility during smiling, both pre- and post-treatment. Patients will notice the change more when it is framed by the lips.
At the end of treatment, we take a couple of these photos again and make a side-by-side comparison using a PowerPoint or Keynote slideshow to show the patient the improvements we have made together, making the patient as much of a part of the process as possible. We then give the patient “before” and “after” portraits cropped onto a piece of US letter-sized photography paper, so he or she can see the new person behind the different smile.
These are just a few ways I incorporate digital photography into my practice to influence and impress patients. It has a tremendous impact for treatments that take months to accomplish and reminds the patient (and the dental team) that what was done was worth the wait!
_____________________________________________________________________________________________________________________________
Editor's Note: This article first appeared in Pearls for Your Practice: The Product Navigator. Click here to subscribe. Click here to submit a products article for consideration.
_____________________________________________________________________________________________________________________________