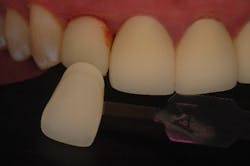
Cross-polarized reflective light dental photography: The silver bullet of tooth shade selection
Dr. Mike Meek says, “Admit it … single-front-tooth cases scare us as dental practitioners …” In his quest to take on challenging anterior restorative cases with a consistent, standard protocol for anterior dental photography, Dr. Meek explains how the use of cross-polarizing filters for shade description completely changed his tooth shade communication for the better.
This article first appeared in the newsletter, DE's Breakthrough Clinical with Stacey Simmons, DDS. Subscribe here.
Admit it … single-front-tooth cases scare us as dental practitioners—so much so that it is not uncommon to hear dentists joke that there is no such treatment plan, only two-front-teeth cases! I realize that this is just a joke, but I also have thought the same thing myself from time to time. A single-front-tooth crown is the great bet we make with our patients. But to win that bet, we have to get the appearance of that crown close enough to the surrounding natural teeth in one or two delivery appointments to please the patient, without using so much chair time that the case becomes unprofitable … and the patient has a magnifying mirror!
Years ago, I began a quest to standardize and accessorize my anterior dental photography protocol so that I could take on these challenging cases with confidence. For the longest time, I tried a variety of images to find a consistent routine for anterior composite, crown, veneer, and dental implant cases. I took ambient light photos, black and white frames, super-macro, and deployed many different Photoshop tricks and adjustments. Over time, I developed a complicated method for communicating shade that was good for a little more than two-thirds of my cases. I was content, yet still hungry for a more consistent technique to communicate shade and to make that single central a two-visit crown procedure!
In 2015 I was doing some research when I stumbled upon the use of cross-polarizing filters for shade description in dentistry, and my interest was piqued. I looked further and learned that the use of cross-polarization frames for shade determination has been part of dentistry as far back as 1996. (1, 2), yet it seems to have drifted out of use due to the advent of digital photography. I wondered, could this particular imaging technique be the silver bullet to my shade communication woes?
What is cross-polarized reflective photography?
When we hear “polarized,” we think sunglasses. Well, polarized sunglasses reduce glare by one step—linear polarization. The gates of the polarized lens are oriented either horizontally or vertically, but not both. This filters the light waves moving in either the east/west or north/south directions as they pass through the lens and to your eyes.
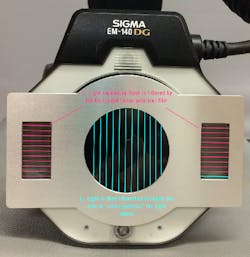
Cross-polarization is a two-step filtering process using two linear polarizer filters—one on the flash oriented either horizontally or vertically, and one on the lens oriented 90 degrees off the axis of the flash filter. This causes the light illuminating the teeth to be filtered for one direction of light wave; then the reflected light is organized in the contrasting direction as it passes through the filter/lens combo and is recorded by the DSLR sensor.
Figure 1 shows the orientation of the polarizer filters on the average macro DSLR rig equipped with a cross-polarizing filter.
The result is a photo that has absolutely no glare or reflection … a photo that allows for much more objective assessment of shade and translucency. Used for implant restorations, the ceramist can very easily assess the shape of the dentin portion of the tooth to help develop the design of a custom abutment, such as the Nobel Procera Angulated Screw Channel Crown.
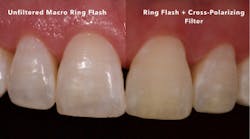
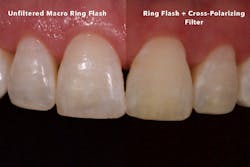
Figure 2 shows the same set of anterior teeth with one-half shown using regular macro-flash photography and the other half using a cross-polarizer setup. The images were married via Photoshop for comparison.
The comparison very handily illustrates what this two-stage filtering or organizing of the light accomplishes: no glare. There is no specular reflection to distract from the actual colors or translucency present in the tooth. It is this matte, glare-free image that allows us to better visualize the real polychromatic nature of teeth.
Using the cross-polarizing reflective light technique
This is a technique made possible by the use of a camera and strobe system, so think DSLR such as a Nikon or Canon and the appropriate ring flash (mandatory) and macro lens. Focal lengths around 100 mm are perfect for intraoral shade photos. Remember, the light has to be filtered or organized coming from the flash, and then filtered a second time in a contrasting direction to allow these images to be formed. This is why consumer digital point-and-shoot cameras are not suited for dental shade records, and that goes for smartphone cameras also.
The simplest method of equipping your DSLR rig with the cross-polarizing filters is to buy the premanufactured kit from one of a couple of vendors on the internet. You may also take the DIY approach with a lens-born linear polarizer and then install polarizer film on your ring flash or strobe. I like the speed and ease of the premanufactured rig, as it allows me to convert from regular visible light photography to this cross-polarized form by merely slapping the filter over my lens and ring flash.
Intraorally, you can take your usual frames with regular light. Then, follow up with frames shot with the cross-polarizing filter on your lens/strobe setup. That’s it!
Case 1: Implant-supported lateral incisor
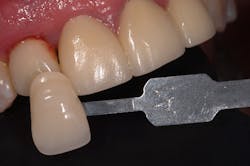
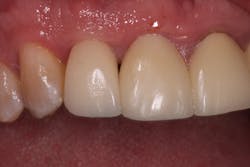
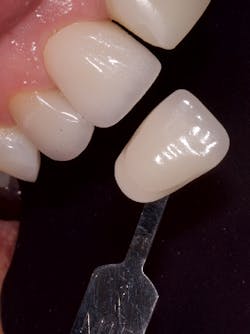
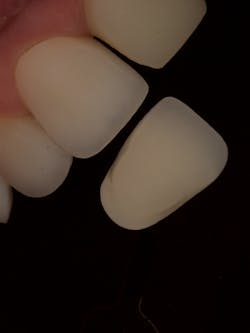
This patient had suffered a fracture of No. 7. I handled his case in what is our usual method—extraction with immediate implant placement and a screw-retained temporary to support the soft-tissue papilla. Four months later, the patient presented for fixture-level impression and photo records for fabrication of the #7 Nobel Procera ASC Crown. I shot the usual visible light frames with the A1 shade tab and then the cross-polarized shot with the same A1 shade tab in the photos. The unit was delivered four weeks later. See Figures 3 and 4.
On the left is the usual visible light frame with shade tab one of two vital photos. On the right is the cross-polarized frame with the same shade tab, which is then recorded to provide the ceramist with the additional information needed to succeed. These two photos, along with the fixture-level impression with custom tissue-supporting matrix, was submitted for fabrication of the Nobel Procera ASC Crown shown in the after photo (figure 5).
Case 2: The single central-implant supported
This case involved extraction of a fractured and failing endodontically treated central (No. 9). The patient had very bleach-white teeth/crowns, and I was worried about how I was going to satisfy her with our outcome. The same photos were recorded. As I stated earlier, I work by method to ensure consistency in results. One series of visible light macro and then the one frame of the tooth under cross-polarized light (figures 6 and 7). The final product is seen in Figure 8.
Both case outcomes were two-restorative-appointment procedures—none of the dreaded try-in and shade-adjustment appointments that drive all of the profitability out of our single-tooth restorations.
I have been impressed by the consistency that use of this old-school photographic technique has brought to my esthetic cases. I have found its use to be advantageous with crowns, veneers, implant restorations, and even composite bonding cases.
The technique is very compatible with general practices because no additional camera or software capability is required. Just clip the filter on the ring flash of your DSLR macro rig and snap the photos. The magnetic attachment system that most cross-polarizing filters marketed to dentists include makes this very convenient.
Setting your DSLR to Aperture Priority mode at F32 makes this an effortless, no-brainer combination for shade photos in both visible and cross-polarized light varieties. Because both dentist or auxiliary alike can take these advanced views with the ease of merely snapping on a filter, a cross-polarizing kit really has been a silver bullet for reducing missed shades on anterior restorations in my practice.
This article first appeared in the newsletter, DE's Breakthrough Clinical with Stacey Simmons, DDS. Subscribe here.
ALSO BY THE AUTHOR:
Fabrication of a chairside custom dental impression coping for fixture-level impressions
References
1. Duarte S Jr., ed. Quintessence of Dental Technology. Hanover Park, IL: Quintessence Publishing Co.; 2014:14.
2. Vanini L. Light and color in anterior composite restorations. Pract Periodontics Aesthet Dent. 1996;8(7):673-682.
